Zero RPO for TKG? How to get Synchronous Disaster Recover for your Tanzu Cluster

Kubecon and VMware Explore are coming up. One of our most popular sessions from our VMware Explore(and VMworld) is the Stretched Cluster for VMware/vVols. Now, you all may notice that SRM and other DR solutions do not work with Tanzu, but I want all of you to know that PX-DR Sync or Metro-DR is supported for Tanzu. This allows you to have ZERO RPO when failing Stateful workloads from 1 cluster to another. This can be from one vSphere cluster to another each running TKG.

Metro-DR

More information for how to setup Sync-DR with Tanzu can be found here in our docs page.

https://docs.portworx.com/operations/operate-kubernetes/disaster-recovery/px-metro/

Pay close attention to the docs as Tanzu has some special steps in the setup because of the way the Cloud Drives are created and managed with raw CNS volumes.

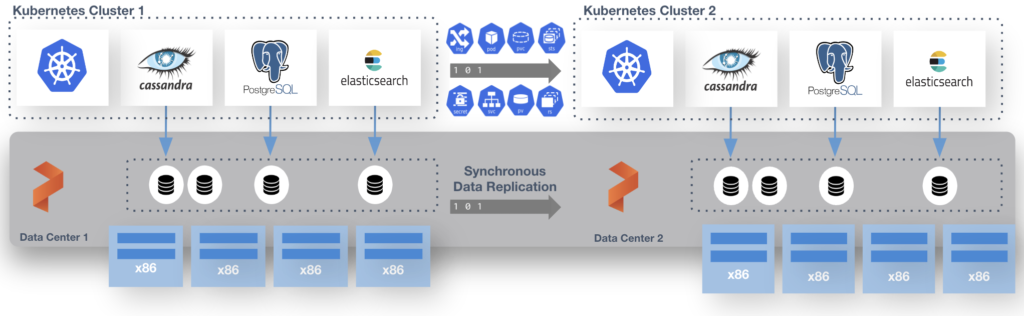
This is done with a shared etcd between the two distinct TKG clusters. That etcd can run at a third site where you would run the “witness node”. I run this in a standalone admin k8s cluster that runs all my internal services like etcd, externaldns, harbor and more. Just so you know this etcd is used by Portworx Enterprise only and is not the one used by k8s.

Slightly better image of Metro-DR

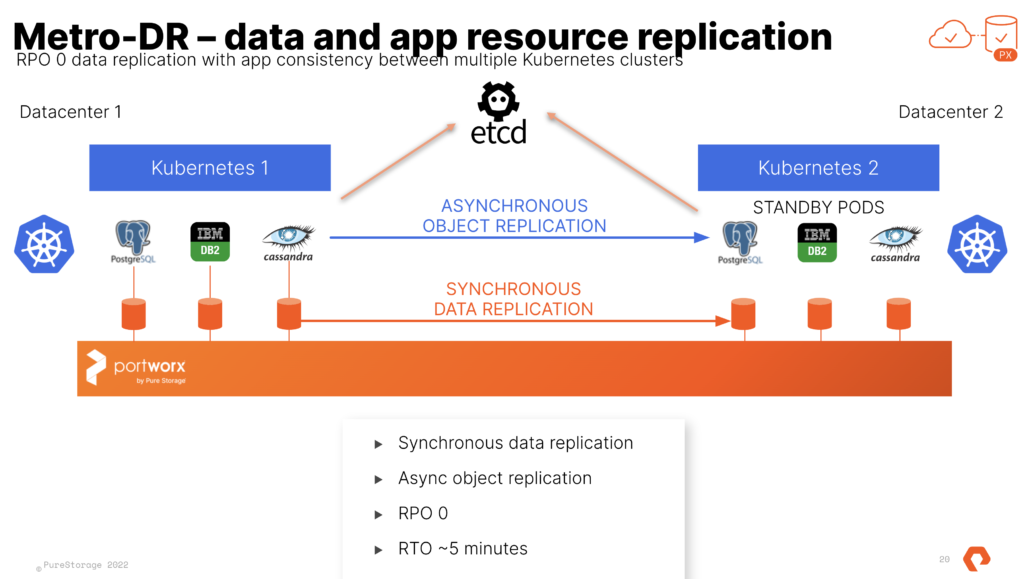
At the end of the process you have 2 TKG Clusters and 1 Portworx Cluster. We use Async schedules to copy the objects between clusters. The data is synchronously copied between nodes only limited by the latency. (Max for sync-dr is 10ms). This means the deployment for Postgres or Cassandra in the picture above is copied on a schedule and the non-live or target cluster is scaled to 0 replicas. The RPO is 0 since the data is copied instantly, the RTO is based on how fast you can spin up the replicas on the target.

Even though Portworx Enterprise and Metro-DR works with any storage target supported by Tanzu (VSAN, NFS Datastores, VMFS Datastores, other vVOls). The SPBM and vVols integrations from Pure Storage with the FlashArray are the most used anywhere. The effort for the integration and collaboration betweet Pure and VMware Engineering is amazing. Cody Hosterman and his team have done some amazing things. Metro-DR works great with Pure vVols and is the perfect cloud-native compliment to your stretched vVols VM’s using FlashArray ActiveCluster. If you are interested in using both together let your Pure Storage team know or send me a message on the twitter and I will track them down for you.

Setting up Portworx on a Tanzu Kubernetes Grid aka TKG Cluster

First, this process works today on clusters made with the TKG tool that does not use the embedded management cluster. For clarity I call those clusters TKC or TKC Guest Clusters. The run as VM’s. You just can’t add block devices outside of the Cloud Native Storage (VMware’s CSI Driver). At least I couldn’t.

Now TKG deploys using a Photon 3.0 template. When I wrote this blog and recorded the demo the current latest version is TKG 1.2.1 and the k8s template is 1.19.3-vmware.

Check the release notes here: https://docs.portworx.com/reference/release-notes/portworx/#improvements-4

First generate base64 encoded versions of your user and password to vCenter.

# Update the following items in the Secret template below to match your environment:

VSPHERE_USER: Use output of printf <vcenter-server-user> | base64
VSPHERE_PASSWORD: Use output of printf <vcenter-server-password> | base64

The vsphere-secret.yaml save this to a file with your own user and password to vCenter (from above).


apiVersion: v1
kind: Secret
metadata:
  name: px-vsphere-secret
  namespace: kube-system
type: Opaque
data:
  VSPHERE_USER: YWRtaW5pc3RyYXRvckB2c3BoZXJlLmxvY2Fs
  VSPHERE_PASSWORD: cHgxLjMuMEZUVw==


kubectl apply the above spec after you update the above template with your user and password.

Follow these steps:

# create a new TKG cluster
tkg create cluster tkg-portworx-cluster -p dev -w 3 --vsphere-controlplane-endpoint-ip 10.21.x.x 

# Get the credentials for your config
tkg get credentials tkg-portworx-cluster

# Apply the secret and the operator for Portworx
kubectl apply -f vsphere-secret.yaml
kubectl apply -f 'https://install.portworx.com/2.6?comp=pxoperator'

#generate your spec first, you get this from generating a spec at https://central.portworx.com
kubectl apply -f tkg-px.yaml 

# Wait till it all comes up.
watch kubectl get pod -n kube-system

# Check pxctl status
PX_POD=$(kubectl get pods -l name=portworx -n kube-system -o jsonpath='{.items[0].metadata.name}')
kubectl exec $PX_POD -n kube-system -- /opt/pwx/bin/pxctl status

You can now create your own or use the premade storageClass

kubectl get sc
NAME                             PROVISIONER                     RECLAIMPOLICY   VOLUMEBINDINGMODE   ALLOWVOLUMEEXPANSION   AGE
default (default)                csi.vsphere.vmware.com          Delete          Immediate           false                  7h50m
px-db                            kubernetes.io/portworx-volume   Delete          Immediate           false                  7h44m
px-db-cloud-snapshot             kubernetes.io/portworx-volume   Delete          Immediate           false                  7h44m
px-db-cloud-snapshot-encrypted   kubernetes.io/portworx-volume   Delete          Immediate           false                  7h44m
px-db-encrypted                  kubernetes.io/portworx-volume   Delete          Immediate           false                  7h44m
px-db-local-snapshot             kubernetes.io/portworx-volume   Delete          Immediate           false                  7h44m
px-db-local-snapshot-encrypted   kubernetes.io/portworx-volume   Delete          Immediate           false                  7h44m
px-replicated                    kubernetes.io/portworx-volume   Delete          Immediate           false                  7h44m
px-replicated-encrypted          kubernetes.io/portworx-volume   Delete          Immediate           false                  7h44m
stork-snapshot-sc                stork-snapshot                  Delete          Immediate           false                  7h44m

Now Deploy Kube-Quake

The example.yaml is from my fork of the kube-quake repo on github where I redirected the data to be on a persistent volume.

kubectl apply -f https://raw.githubusercontent.com/2vcps/quake-kube/master/example.yaml
deployment.apps/quakejs created
service/quakejs created
configmap/quake3-server-config created
persistentvolumeclaim/quake3-content created

k get pod
NAME                      READY   STATUS              RESTARTS   AGE
quakejs-668cd866d-6b5sd   0/2     ContainerCreating   0          7s
k get pvc
NAME             STATUS   VOLUME                                     CAPACITY   ACCESS MODES   STORAGECLASS   AGE
quake3-content   Bound    pvc-6c27c329-7562-44ce-8361-08222f9c7dc1   10Gi       RWO            px-db          2m

k get pod
NAME                      READY   STATUS    RESTARTS   AGE
quakejs-668cd866d-6b5sd   2/2     Running   0          2m27s

k get svc
NAME         TYPE           CLUSTER-IP     EXTERNAL-IP   PORT(S)                                         AGE
kubernetes   ClusterIP      100.64.0.1     <none>        443/TCP                                         20h
quakejs      LoadBalancer   100.68.210.0   <pending>     8080:32527/TCP,27960:31138/TCP,9090:30313/TCP   2m47s

Now point your browser to: http://<some node ip>:32527
Or if you have the LoadBalancer up and running go to the http://<Loadbalancer IP>:8080

Portworx and TKG – Portworx Scalable Storage in TKG

Portworx + Pure Storage = awesome

I have recently been pretty occupied with learning TKG and oh yeah also Portworx. I wanted to share what I have learned so far when it comes to getting Portworx up and running in a TKG Cluster. So without too much introduction lets dive right in.

Create a new cluster

You need 3 worker nodes for Portworx.

tkg create cluster px1 --plan=dev -w 3

Install Portworx

Get IP’s for Ansible inventory
TKG uses DHCP for all of the deployed Kubernetes VM’s which is fine. This command will create an inventory.ini in order to run ansible playbooks against the cluster. Remember if you add nodes to update the inventory.ini.

kubectl get nodes -o jsonpath='{.items[*].status.addresses[?(@.type=="ExternalIP")].address}' | awk -v ORS='\n' '{ for (i = 1; i <= NF; i++) print $i }' >inventory.ini

Run the Ansible Playbook
This playbook is install the linux headers the TKG Photon template does not include. Copy this playbook and save it to playbook.yaml for example.

--- 
- hosts: all 
  become: yes 
  tasks: 
  - name: upgrade photon 
    raw: tdnf install -y linux-devel-$(uname -r)
ansible-playbook -i inventory.ini -b -v playbook.yaml -u capv

Notice that the username for the TKG nodes is capv.

# Follow this link from portworx for more details.

https://docs.portworx.com/cloud-references/auto-disk-provisioning/vsphere/

Create the vsphere credentials in a secret

Create a vsphere-secret.yaml file and paste the yaml below making sure replace the credentials with your own generated with the base64 example below.

#VSPHERE_USER: Use output of printf <vcenter-server-user> | base64
#VSPHERE_PASSWORD: Use output of printf <vcenter-server-password> | base64
apiVersion: v1
kind: Secret
metadata:
  name: px-vsphere-secret
  namespace: kube-system
type: Opaque
data:
  VSPHERE_USER: YWRtaW5pc3RyYXRvckB2c3BoZXJlLmxvY2Fs
  VSPHERE_PASSWORD: cHgxLjMuMEZUVw==

Then apply the secret

kubectl apply -f vsphere-secret.yaml

# Hostname or IP of your vCenter server

export VSPHERE_VCENTER=vc01.fsa.lab


# Prefix of your shared ESXi datastore(s) names. Portworx will use datastores who names match this prefix to create disks.

export VSPHERE_DATASTORE_PREFIX=px1


# Change this to the port number vSphere services are running on if you have changed the default port 443

export VSPHERE_VCENTER_PORT=443

export VSPHERE_DISK_TEMPLATE=type=thin,size=200

export VER=$(kubectl version --short | awk -Fv '/Server Version: /{print $3}')

curl -fsL -o px-spec.yaml "https://install.portworx.com/2.6?kbver=$VER&c=portworx-demo-cluster&b=true&st=k8s&csi=true&vsp=true&ds=$VSPHERE_DATASTORE_PREFIX&vc=$VSPHERE_VCENTER&s=%22$VSPHERE_DISK_TEMPLATE%22"

kubectl apply -f px-spec.yaml

So the curl command at the end of this code block will create the px-spec.yaml file that will install Portworx in your cluster. Notice all the variables that have to be set for this to work. If you skip any of these above or below you will have problems.

Create a repl = 3 storage class or whatever you want to test.

Copy the text below to a new file called px-repl3-sc.yaml

kind: StorageClass
apiVersion: storage.k8s.io/v1
metadata:
    name: px-repl3-sc
provisioner: kubernetes.io/portworx-volume
parameters:
   repl: "3"

Then apply the new StorageClass

kubectl apply -f px-repl3-sc.yaml

PX Backup also will get you the PX-Central UI

helm install px-backup portworx/px-backup --namespace px-backup --create-namespace --set persistentStorage.enabled=true,persistentStorage.storageClassName="px-repl3-s"

This will get you up and running on a trial license and enough to experiment and learn Portworx. If you are new to helm make sure to learn more here.