Kubecon and VMware Explore are coming up. One of our most popular sessions from our VMware Explore(and VMworld) is the Stretched Cluster for VMware/vVols. Now, you all may notice that SRM and other DR solutions do not work with Tanzu, but I want all of you to know that PX-DR Sync or Metro-DR is supported for Tanzu. This allows you to have ZERO RPO when failing Stateful workloads from 1 cluster to another. This can be from one vSphere cluster to another each running TKG.
Metro-DR
More information for how to setup Sync-DR with Tanzu can be found here in our docs page.
Pay close attention to the docs as Tanzu has some special steps in the setup because of the way the Cloud Drives are created and managed with raw CNS volumes.
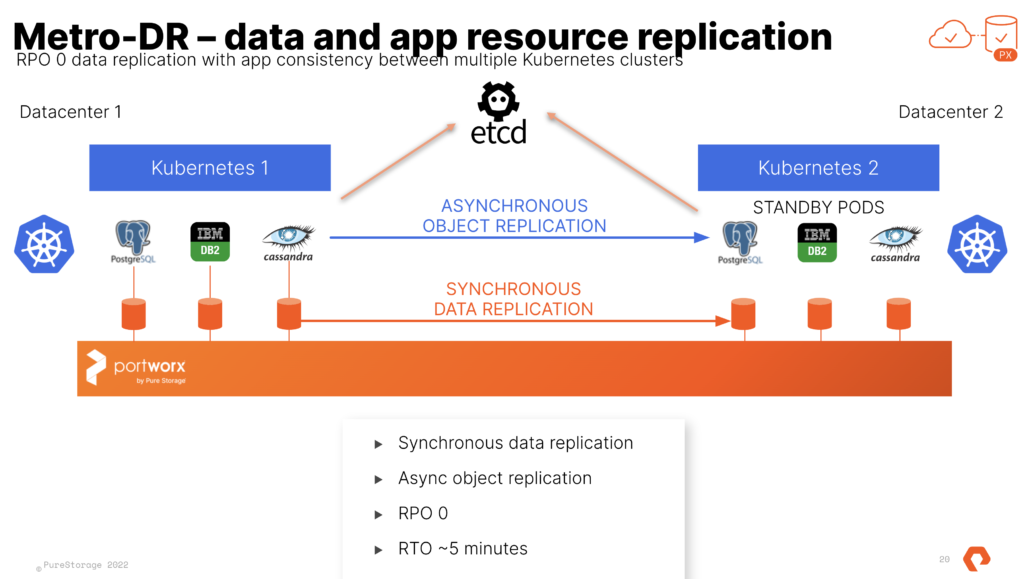
This is done with a shared etcd between the two distinct TKG clusters. That etcd can run at a third site where you would run the “witness node”. I run this in a standalone admin k8s cluster that runs all my internal services like etcd, externaldns, harbor and more. Just so you know this etcd is used by Portworx Enterprise only and is not the one used by k8s.
Slightly better image of Metro-DR
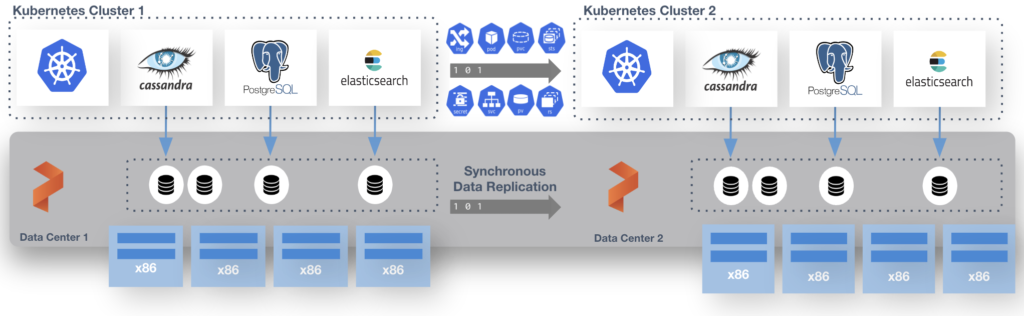
At the end of the process you have 2 TKG Clusters and 1 Portworx Cluster. We use Async schedules to copy the objects between clusters. The data is synchronously copied between nodes only limited by the latency. (Max for sync-dr is 10ms). This means the deployment for Postgres or Cassandra in the picture above is copied on a schedule and the non-live or target cluster is scaled to 0 replicas. The RPO is 0 since the data is copied instantly, the RTO is based on how fast you can spin up the replicas on the target.
Even though Portworx Enterprise and Metro-DR works with any storage target supported by Tanzu (VSAN, NFS Datastores, VMFS Datastores, other vVOls). The SPBM and vVols integrations from Pure Storage with the FlashArray are the most used anywhere. The effort for the integration and collaboration betweet Pure and VMware Engineering is amazing. Cody Hosterman and his team have done some amazing things. Metro-DR works great with Pure vVols and is the perfect cloud-native compliment to your stretched vVols VM’s using FlashArray ActiveCluster. If you are interested in using both together let your Pure Storage team know or send me a message on the twitter and I will track them down for you.
For the demo I have 2 Kubernetes clusters with a single stretched Portworx cluster in AWS. This allows Metro DR to mirror the data between the 2 clusters so if there is a complete loss of Cluster 1 the application can be restarted with no loss of data.
You can have active workloads on both clusters. Just FYI.
Lots of new things to learn over the last month. I wanted to present everyone with my first demo with #portworxbypure. The official documentation is here. Always read the docs on how to set it up.
For the demo I have 2 Kubernetes clusters with a single stretched Portworx cluster in AWS. This allows Metro DR to mirror the data between the 2 clusters so if there is a complete loss of Cluster 1 the application can be restarted with no loss of data. The ELB in Amazon can be set to provide little interaction when getting your app back up and working, for this demo I tell the the deployment to fail over. Sort of the big red button for failover. Like all the things Cloud Native this can be automated.
Please check out this demo on YouTube and let me know what you think.
There are of course many options when it comes to how your app will work and this is for a basic web frontend and database. Scale out databases can be treated different. It all depends on how your application is architected and what the DR requirements will be.
TL;DR – Move Kubernetes volumes from legacy storage to Pure Storage.
So you have an amazing new Pure Storage array in the datacenter or in public cloud. The Container Storage Interface doesn’t provide a built in way to migrate data between backend devices. I previously blogged about a few ways to clone and migrate data between clusters but the data has to already be located on a Pure FlashArray.
Lately, Pure has been working with a new partner Kasten. While more is yet to come. Check out this demo (just 5:30) and see just how easy it is to move PVC’s while maintaining the config of the rest of the k8s application.
Demo EBS to CBS (this could be used to migrate off other devices too)
This demo used EKS in AWS for the Kubernetes cluster.
Application initially installed using a PVC for MySQL on EBS.
Kasten is used to backup the entire state of the app with the PVC to S3. This target could be a FlashBlade in your datacenter.
The application is restored to the same namespace but a Kasten Transform is used to convert the PVC to the “pure-block” StorageClass.
Application is live and using PSO for the storage on Cloud Block Store.
Why
Like the book says, “End with why”. Ok maybe it doesn’t actually say that. Let’s answer the “why should I do this?”
First: Why move EBS to CBS This PVC is 10GB on EBS. At this point in time it consumes about 30MB. How much does the AWS bill on the 10GB EBS volume? 10GB. On Cloud Block Store this data is reduced (compressed and deduped) and thin provisioned. How much is on the CBS? 3MB in this case. Does this make sense for 1 or 2 volumes? Nope. If your CIO has stated “move it all to the cloud!” This can be a significant savings on overall storage cost.
Second: Why move from (some other thing) to Pure? I am biased to PSO for Kubernetes so I will start there and then give a few bullets of why Pure, but this isn’t the sales pitch blog. Pure Service Orchestrator allows you a simple single line to install and begin getting storage on demand for your container clusters. One customer says, “It just works, we kind of forget it is there.” and another commented, “I want 100GB of storage for my app, and everything else is automated for me.”
Why Pure?
Efficiency – Get more out of the all-flash, higher dedupe with no performance penalty does matter.
Availability – 6×9’s uptime measured across our customer base, not an array in a validation lab. Actual customers love us.
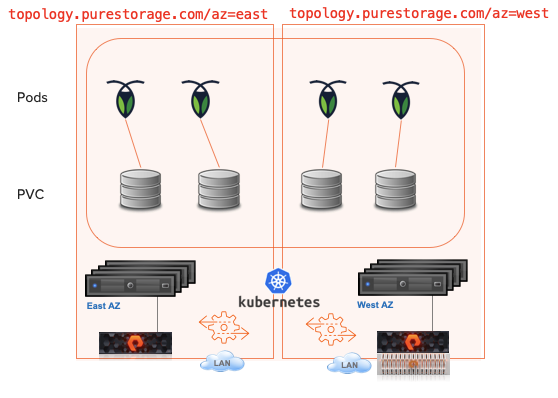
In this post, I’m going to discuss how to load balance your storage provisioning across a fleet of Pure Storage FlashArrays.
As an integral part of Pure’s Kubernetes integration, Pure Service Orchestrator has the ability to load balance across a fleet of Pure storage devices. This is great for your containerized space, but I wondered how you could do something similar for arrays in a non-containerized environment. For example, a vSphere environment where there are multiple Pure Storage FlashArrays available to a vCenter and when creating a new datastore, you want to do this on the least full array.
What I wanted to do was orchestrate which storage array a volume was provisioned on automatically without the storage administrator having to keep checking which array to use. Now, when I think of automation and orchestration I immediately think of Ansible.
Pure Storage has an amazing suite of modules for Ansible that we can leverage to do this work, so I created an Ansible load-balancing role called, logically enough, lb.
The role takes a list of arrays, interrogate them and works out which has the least used capacity and then provide the information required for the rest of the playbook to provision against that array.
So where can you find this role and how do you use it?
The role can be found on the Pure Storage OpenConnect GitHub account in the ansible-playbook-examples repository, under the flasharray/roles directory.
To use it requires you to populate the variables file roles/lb/vars/main.yml with the management IP addresses of your fleet of arrays, together with an API token for a storage admin privilege user for each array. I guess there is no limit to the number of arrays you can load balance over, but the example below is for a fleet of six FlashArrays.
The populated file would look something like this (use your own array credentials):
To use the role just add it into your Ansible playbook.
If you are security-minded, then all of these entries in the URL and API token can be encrypted using Ansible Vault. I wrote another blog post that included details on how to implement Vault for these variable.
When the role has run two variables will have been defined: use_url and use_api. These identify the array with the lowest utilization level and therefore the one you should be provisioning to. There is also an additional variable you can use (use_name) that identifies the true name of the array selected.
A super simple playbook that uses the lb role and then provisions a single volume to the least full array is shown here:
- name: Pure Storage load balancing example
  hosts: localhost
  gather_facts: no
  vars:
    array_usage: []    # Do not remove - required by the role
  roles:
    - role: lb

  tasks:
  - name: Provisioning to {{ use_name }}
    purefa_volume:
      fa_url: "{{ use_url }}"
      api_token: "{{ use_api }}"
      name: lb_test
      size: 50G
I hope this short post and this role prove useful, and if you have any of your own roles or playbooks for Pure Storage devices that you think would be useful to other users, please feel free to contribute them to the ansible-playbook-examples GitHub repository.
How to Upgrade your PSO FlexDriver deployment to the latest CSI-based driver
Smart Provisioning with PSO
Over the past few months, the Kubernetes FlexDriver codebase has been deprecated and there is a solid shift towards using CSI-based drivers for providing Persistent Volumes to Kubernetes environments.
I’m not going to address the reasons behind that shift here, but suffice to say that all the major storage providers are now using the CSI specification for their persistent storage drivers in Kubernetes.
This is great, but what about those early adopters who installed FlexDriver based drivers?
It’s not the easiest thing to migrate the control of a persistent volume from one driver to another, in fact, it is practically impossible unless you are a Pure Storage customer and are using PSO.
With the latest release of PSO, ie 5.2.0, there is now a way to migrate your PSO FlexDriver created volumes under the control of the PSO CSI driver.
It’s still not simple and it’s a little time consuming, and you do need an outage for your application, but it is possible.
Simply (sic), these are the steps you need to undertake to perform your migration:
Scale down your applications so that no pods are using the FlexDriver managed PVCs and PVs.
Uninstall your FlexDriver – don’t worry all your PVs and PVCs will remain and the applications using them won’t notice.
Install the CSI based driver – now all new PVs will be managed by this new driver.
Identify your PVs that were created by the FlexDriver.
Patch the PV definition to ensure it doesn’t get automatically deleted by Kubernetes.
Delete the PVC and then the PV – sounds scary, but the previous patch command means that underlying volume on the backend storage is retained
Import the storage volume back into Kubernetes and under the CSI drivers control – this is where you need PSO v5.2.0 or higher…
Scale back up your applications.
Well that was easy, wasn’t it?
More details on exactly how to perform the steps above are detailed in the PSO GitHub repository documentation.
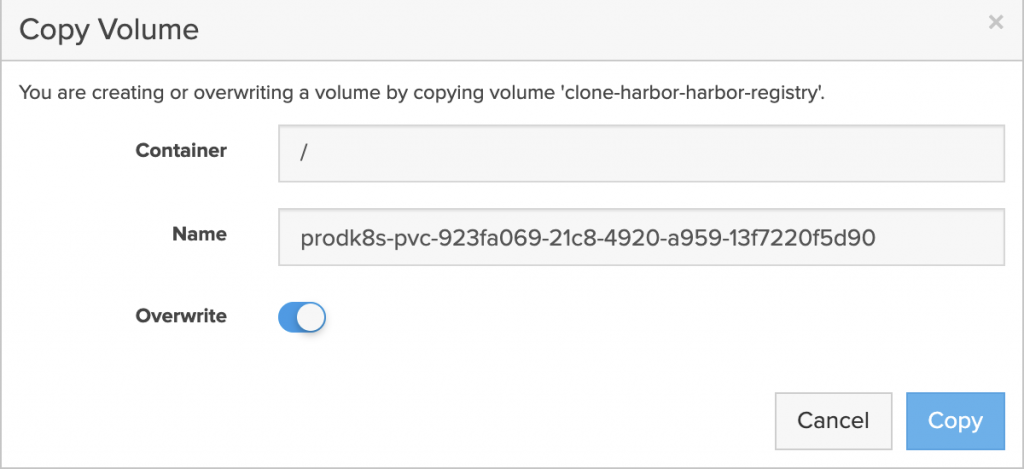
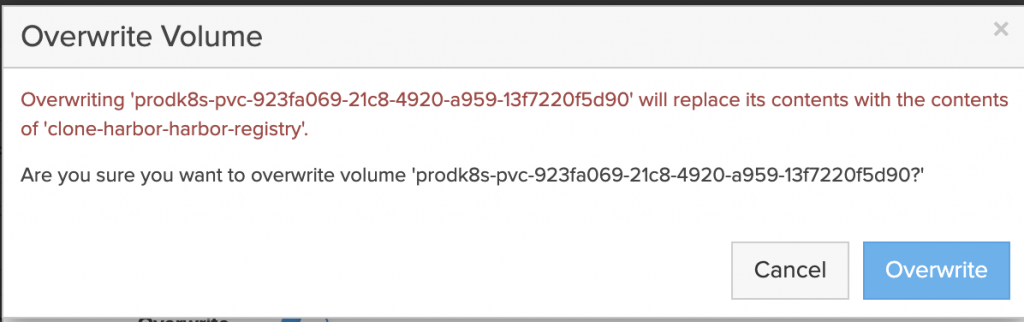
Now, you may feel a little paranoid about these deletion commands you are running against your precious data, so as a “belt and braces” type activity, you could always make a clone or a snapshot of your underlying storage volumes on your array before you do step 6. But remember to delete these clones when you have completed the migration.
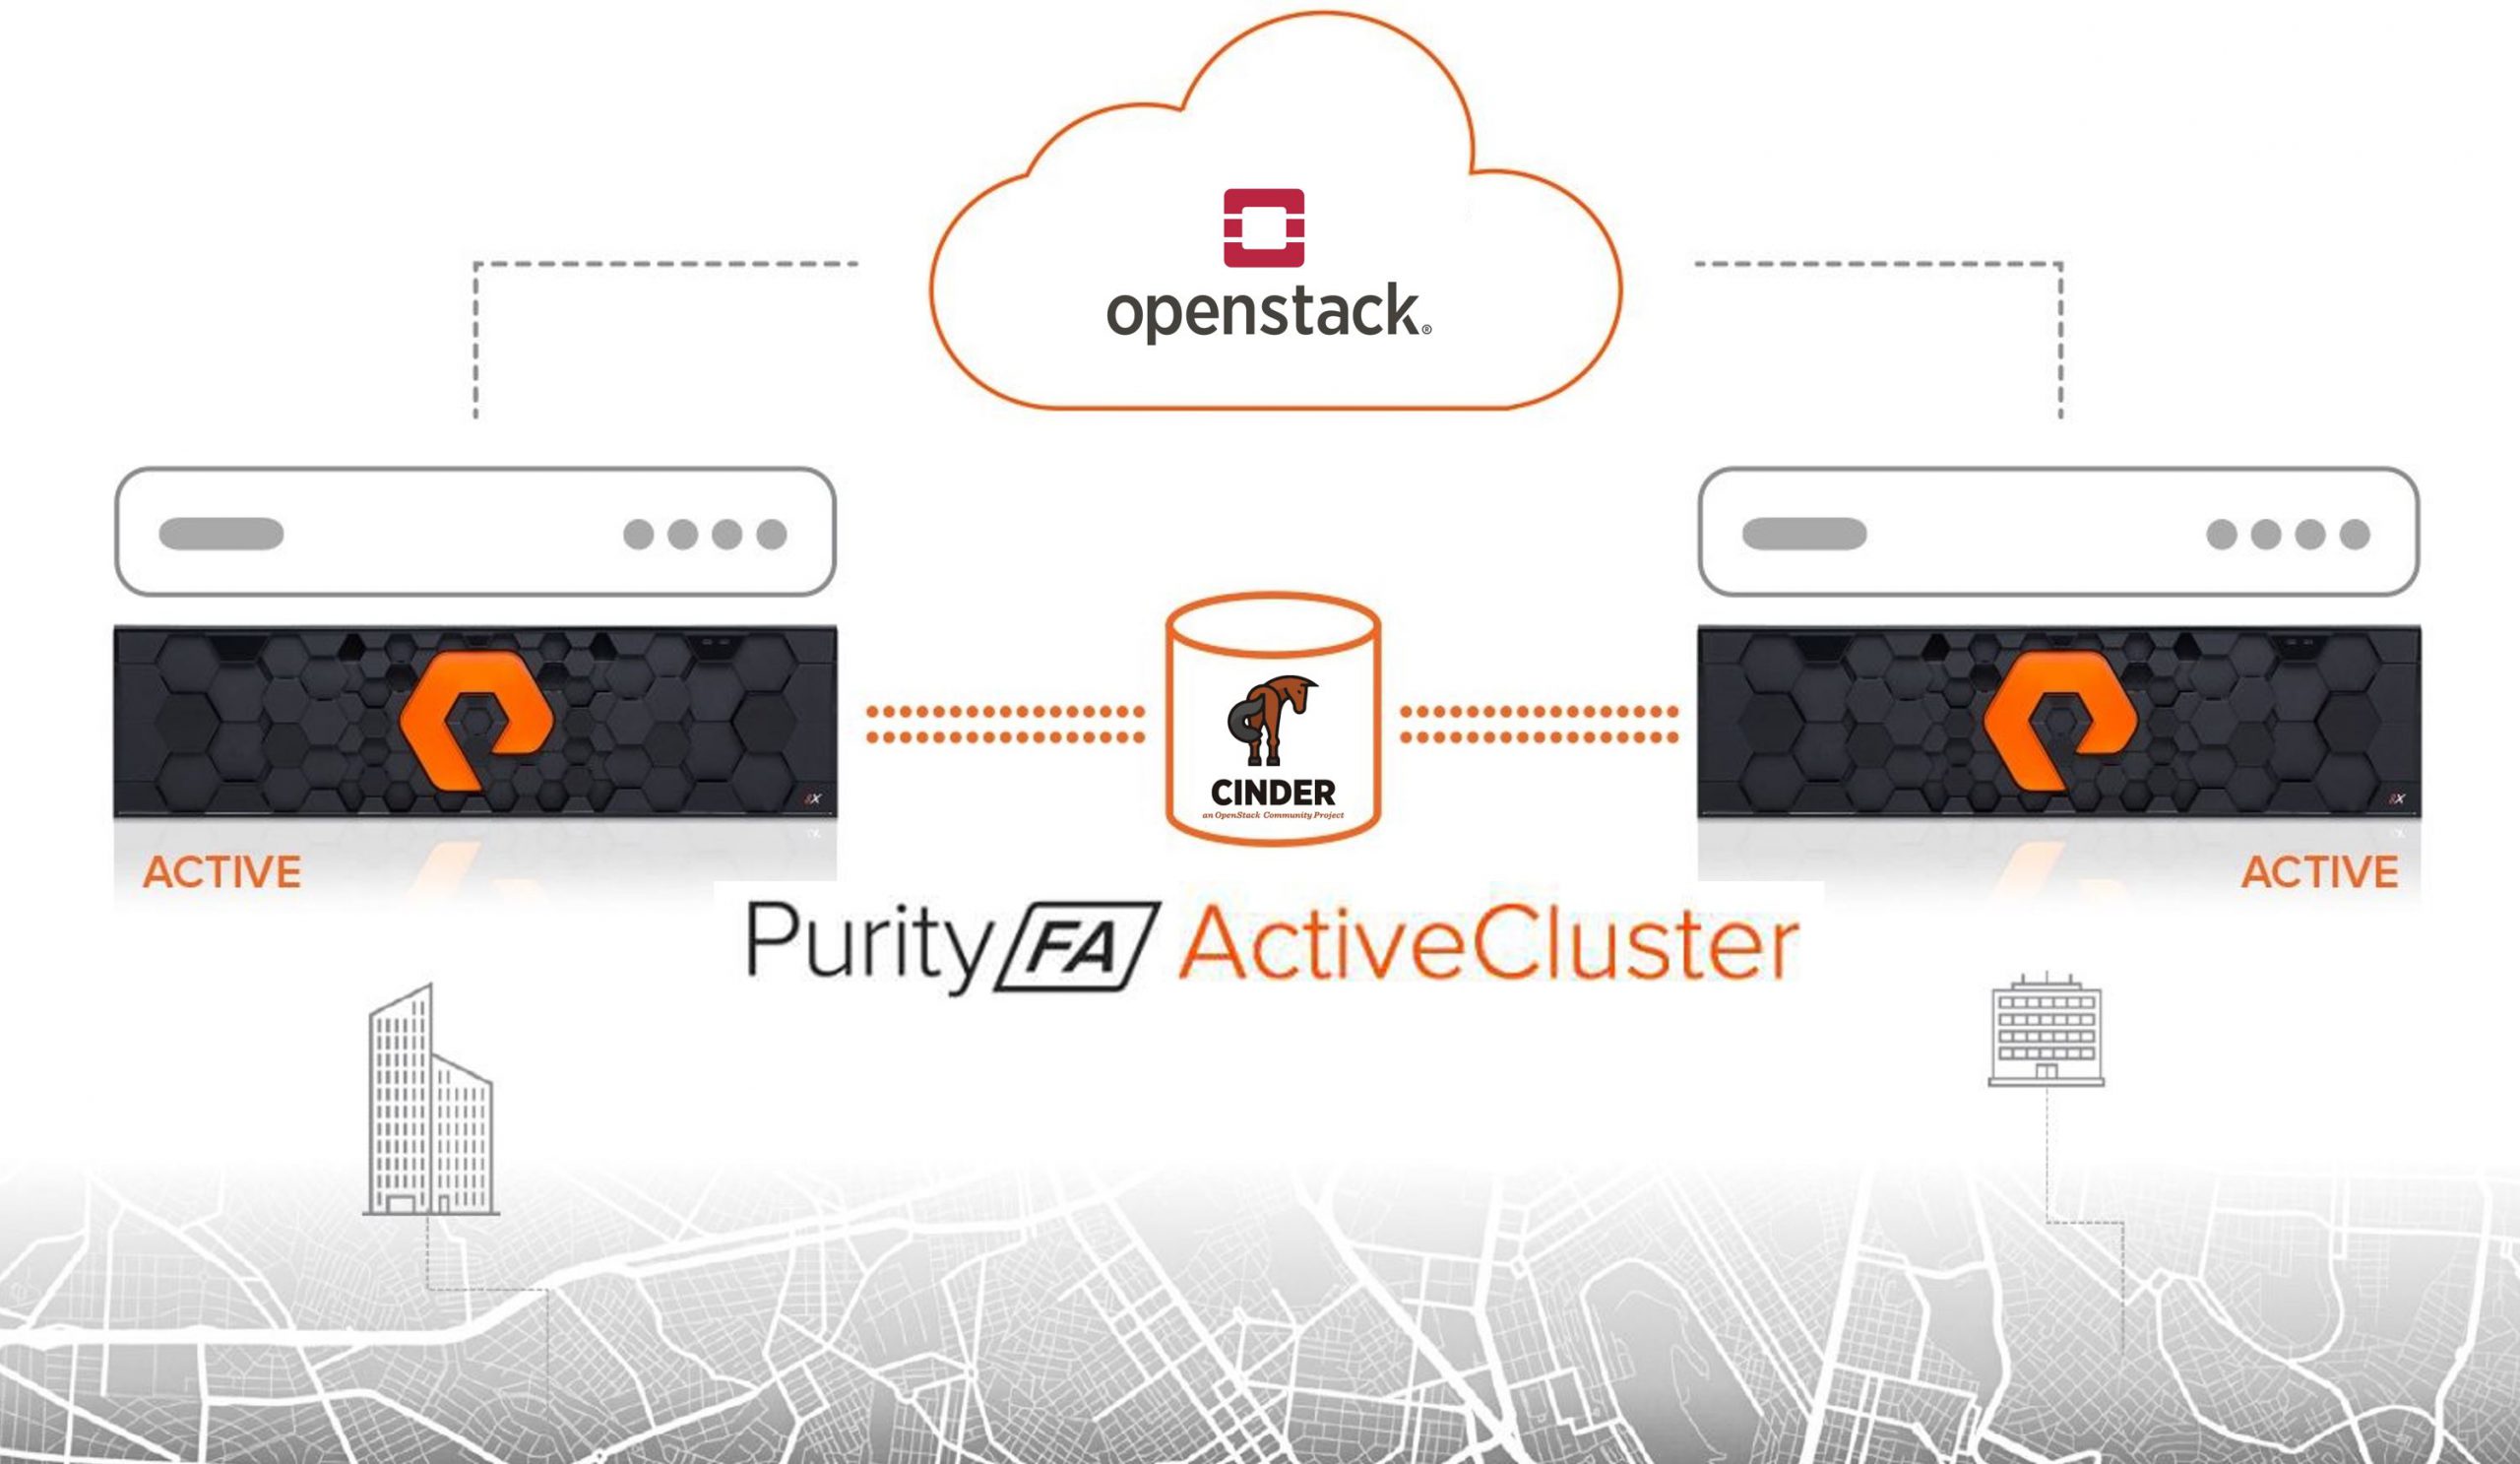
Since the Mitaka release of OpenStack, the Pure Storage Cinder driver has supported Cinder replication, although this first iteration only supported asynchronous replication.
The Rocky release of OpenStack saw Pure’s Cinder driver support synchronous replication by integrating our ActiveCluster feature from the FlashArray.
This synchronous replication automatically created an ActiveCluster pod on the paired FlashArrays called cinder-pod. A pretty obvious name I would say.
While this provided a seamless integration for OpenStack users to create a synchronously replicated volume using a correctly configured volume type, there was one small limitation. ActiveCluster pods were limited to 3000 volumes.
Now you might think that is more than enough volumes for any single ActiveCluster environment. I certainly did until I received a request to be able to support 6000 volumes synchronously replicated.
After some scratching of my head, I remembered that from the OpenStack Stein release of the Pure Cinder driver there is an undocumented (well, not very well documented) parameter that allows the name of the ActiveCluster pod to be customizable and that gave me an idea….
Can you configure Cinder to use the same backend as separate stanzas in the Cinder config file with different parameters?
It turns out the answer is Yes.
So, here’s how to enable your Pure FlashArray Cinder driver to use a single ActiveCluster pair of FlashArrays to allow for 6000 synchronously replicated volumes.
First, we need to edit the cinder.conf file and create two different stanzas for the same array that is configured in an ActiveCluster pair and ensure we have enabled both of these backends:
If we look at the two stanzas, the only difference is that the pure_replication_pod_name is different. I have also set the volume_backend_name to be the same for both configurations. There is a reason for this I will cover later.
After altering the configuration file, make sure to restart your Cinder Volume service to implement the changes.
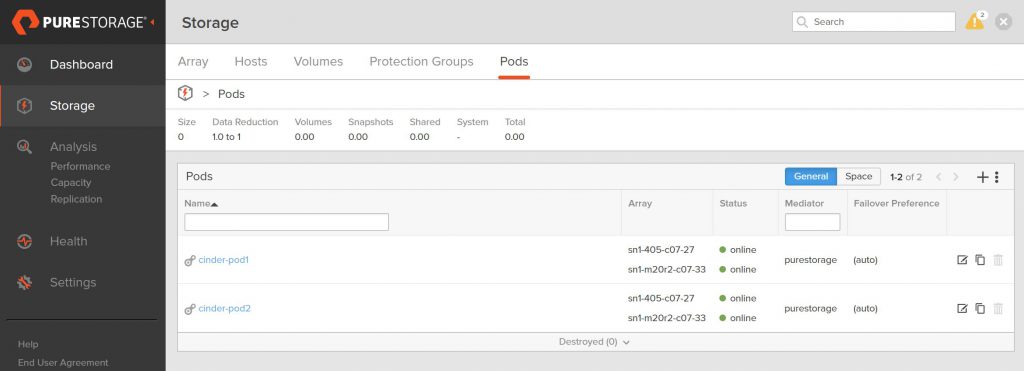
After restarting the cinder-volume service, you will see on the FlashArray that two ActiveCluster pods now exist with the names defined in the configuration file.
This is the first step.
Now we need to enable volume types to be able to use these pods and also to load-balance across the two pods – why load-balance? It just seems to make more sense to make volumes evenly utilize the pods, but there is no specific reason for doing this. If you wanted to use each pod separately, then you would need to set a different volume_backend_name in the Cinder configuration file for each array stanza.
When creating a volume type to use synchronous replication you need to set some specific extra_specs in the type definition. These are the commands to use:
openstack volume type create pure-repl
openstack volume type set --property replication_type=’<in> sync’ pure_repl
openstack volume type set --property replication_enabled=’<is> True’ pure_repl
openstack volume type set --property volume_backend_name=’pure’ pure_repl
The final configuration of the volume type would now look something like this:
 openstack volume type show pure-repl
 +--------------------+-------------------------------------------------------------------------------------------+
 | Field              | Value                                                                                     |
 +--------------------+-------------------------------------------------------------------------------------------+
 | access_project_ids | None                                                                                      |
 | description        | None                                                                                      |
 | id                 | 2b6fe658-5bbf-405c-a0b6-c9ac23801617                                                      |
 | is_public          | True                                                                                      |
 | name               | pure-repl                                                                                 |
 | properties         | replication_enabled='<is> True', replication_type='<in> sync', volume_backend_name='pure' |
 | qos_specs_id       | None                                                                                      |
 +--------------------+-------------------------------------------------------------------------------------------+
Now, all we need to do is use the volume type when creating
our Cinder volumes.
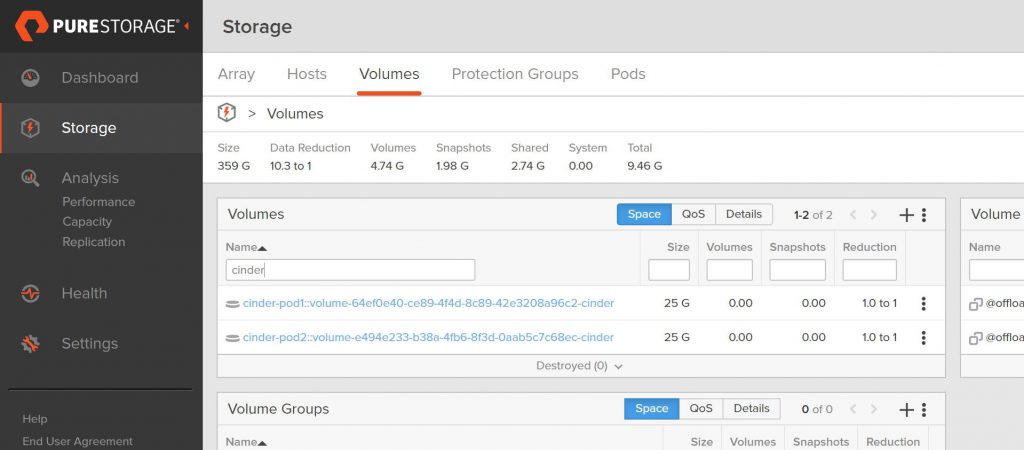
Let’s create two volumes and see how they appear on the FlashArray:
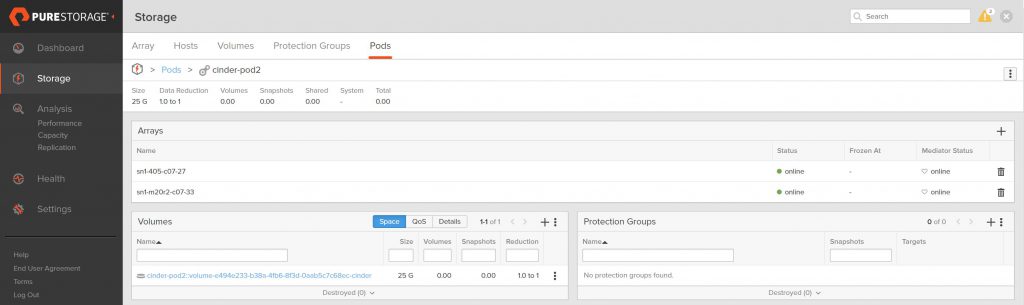
Looking at the FlashArray, we can see the two volumes we just created (I am filtering the volume name on cinder just so you only see the OpenStack related volumes on this array)
The volume naming convention we use at Pure shows that these
volumes are in a pod due to the double colon (::)
in the name and the pod name for each volume is cinder-pod1
and cinder-pod2 respectively.
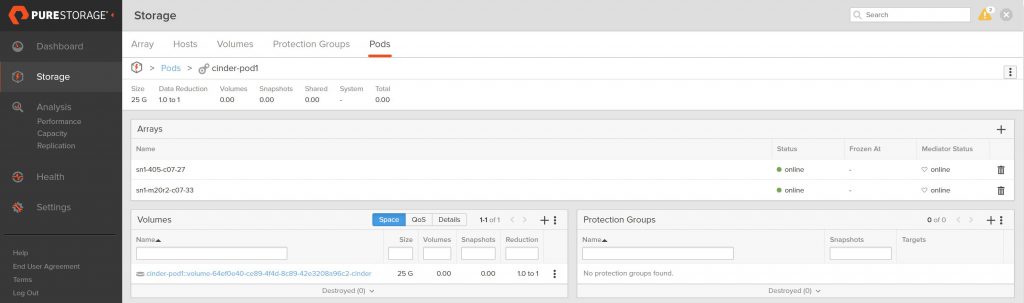
The view of each pod also shows only one volume in each.
If you didn’t want to load-balance across the pods and needed the flexibility to specify the pod a volume exists in, all I need do is set the volume_backend_name to be different in the configuration file array stanzas and then create two volume types. Each would point to the different volume_backend_name setting.
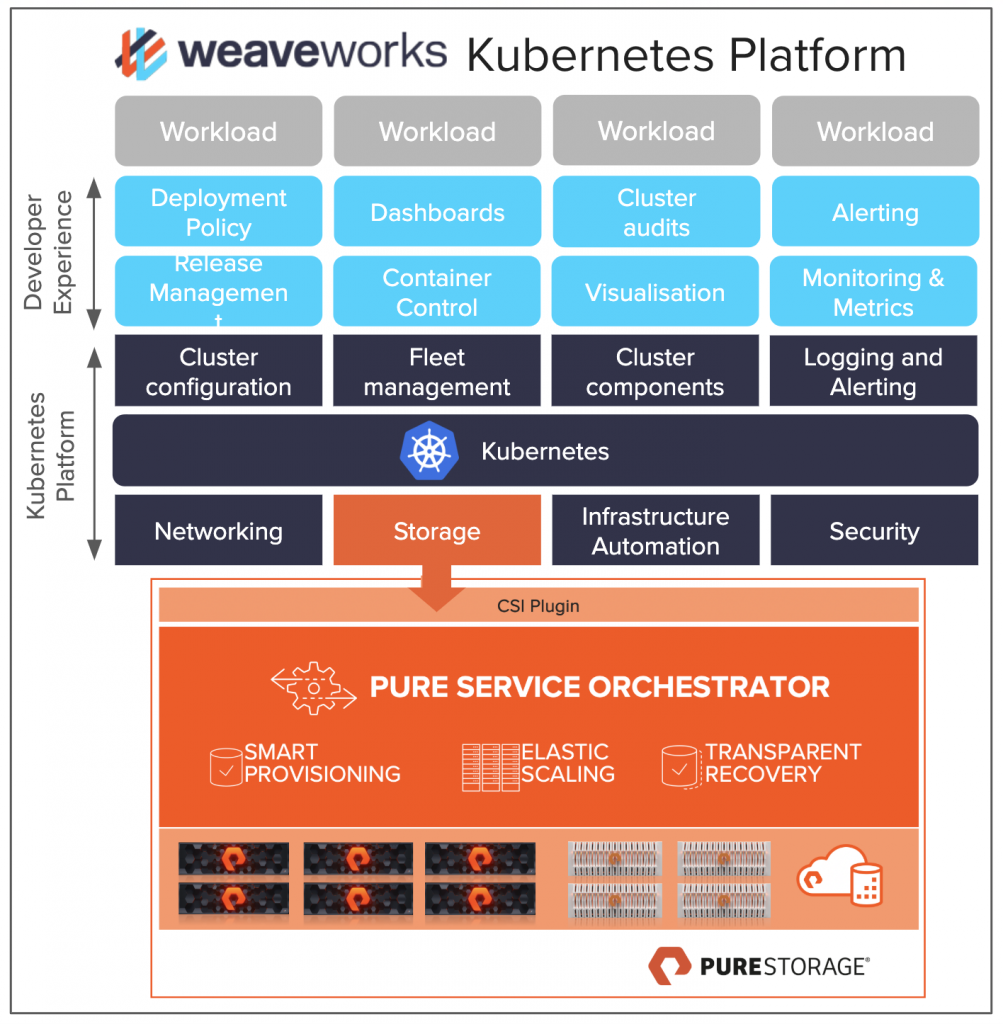
I am pretty excited to be doing a webinar with Weaveworks on Weave Kubernetes Platform and Pure Storage. I met Damani at Kubecon and Re:Invent and we have been talking about doing this for months. I am excited to integrate Pure Service Orchestrator and Pure Storage into a platform providing a full collection of what you need to run k8s. Some things we will cover:
How the Weave Kubernetes Platform and its GitOps workflows unify deployment, management, and monitoring for clusters and apps
How Pure Service Orchestrator accelerates application build and delivery with 6 9’s storage uptime. PSO works for ON PREM and Public Cloud
Live Demo – I am going to show some CSI goodness. Promise.
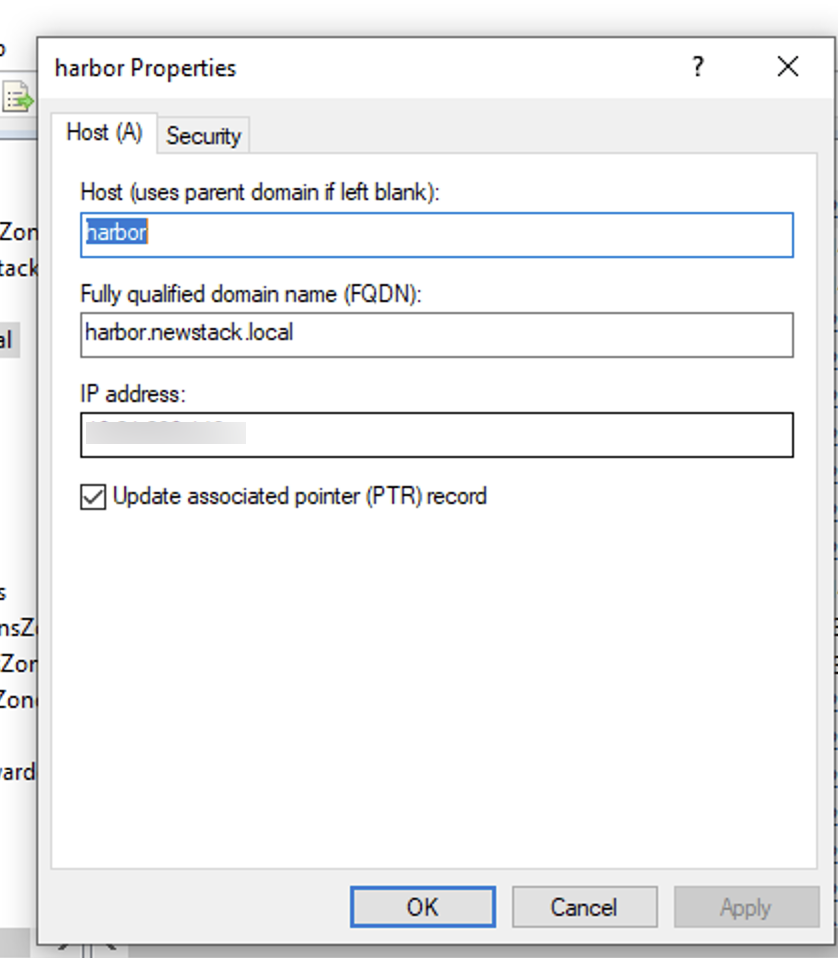
Sometimes I have to look up information and I think that is so simple I shouldn’t blog about it. Then I think I should share the link so if anyone else finds it, I might be helpful. Today the 2nd one wins.
I just want to note that the alarm comes at like 180 days, which is super nice but the renewed cert is only good for 364 more days. This can not be changed right now. I suggest though for the ease of use renew the certificate before it expires to avoid extra work.