The key here is to deploy Cassandra via PDS then get the server connection names from PDS. Each step is explained in the repo. Go over there and fork or clone the repo or just use my settings. A quick summary though (it is really this easy).
Deploy Cassandra to your Target in PDS.
Edit the env-secret.yaml file to match your deployment.
Apply the secret. kubectl -n namespace apply -f env-secret.yaml
Apply the deployment. kubectl -n namespace apply -f worker.yaml
Check the database in the Cassandra pod. kubectl -n namespace exec -it cas-pod — bash
Use cqlsh to check the table the app creates.
That is it pretty easy and it creates a lot of records in the database. You could also scale it up in order to test connections from many sources. I hope this helps you quickly use PDS and if you have any updates or changes to me repo please submit a PR.
This week Portworx Enterprise 2.9.0 released with it comes support for K8s 1.22 and the new Essentials for FlashArray License. You can now have more nodes and capacity and as many clusters as you like. Previously you only got 5 nodes and a single cluster for PX Essentials. More info in the release notes:
While creating the spec you will get the commands to run with kubectl to create the px-pure-secret. This secret takes the pure.json file and puts it in a place where the Portworx Installer will use it to provision it’s block devices from FlashArray. How to create the pure.json file? More info here: https://docs.portworx.com/cloud-references/auto-disk-provisioning/pure-flash-array/#deploy-portworx
Apply the Operator and the Storage Cluster. Enjoy your new data platform for Kubernetes.
When Portworx detects the drives are coming from a FlashArray the License is automatically set! Nothing special to do!
Watch the walkthrough
PX + FA = ❤️
First, the ability to use Portworx with FlashArray is not new with 2.9.0. What is new is the automatic Essentials license. Of course you would have benefits of upgrading Essentials to Enterprise to get DR, Autopilot and Migration. Why would you want to run Portworx on the FlashArray? The central storage platform from the FlashArray give all the benefits you are used to with Pure but to your stateful workloads. All Flash Performance. No disruptive upgrade everything. Evergreen. Dedupe and compression with no performance impact. Thin provisioning. Put it this way? The same platform you run baremetal and vm based business critical apps? Oracle, MS SQL?Shouldn’t it run your modernized cloud native versions of these applications? (Still can be containerized Oracle or SQL so don’t @ me.) Together with Portworx it just makes sense to be better together.
PX + FB = ❤️
Don’t get confused. While the PX Store layer needs block storage to run, FlashBlade and Portworx has already been supported as a Direct Attach target for a while now. You may even notice in the demo above my pure.json includes my FlashBlade. So go ahead use them all.
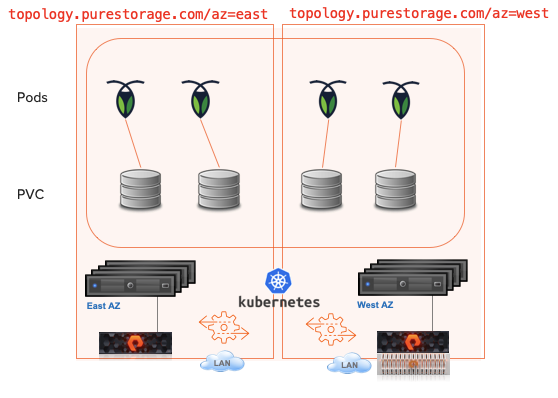
For the demo I have 2 Kubernetes clusters with a single stretched Portworx cluster in AWS. This allows Metro DR to mirror the data between the 2 clusters so if there is a complete loss of Cluster 1 the application can be restarted with no loss of data.
You can have active workloads on both clusters. Just FYI.
Lots of new things to learn over the last month. I wanted to present everyone with my first demo with #portworxbypure. The official documentation is here. Always read the docs on how to set it up.
For the demo I have 2 Kubernetes clusters with a single stretched Portworx cluster in AWS. This allows Metro DR to mirror the data between the 2 clusters so if there is a complete loss of Cluster 1 the application can be restarted with no loss of data. The ELB in Amazon can be set to provide little interaction when getting your app back up and working, for this demo I tell the the deployment to fail over. Sort of the big red button for failover. Like all the things Cloud Native this can be automated.
Please check out this demo on YouTube and let me know what you think.
There are of course many options when it comes to how your app will work and this is for a basic web frontend and database. Scale out databases can be treated different. It all depends on how your application is architected and what the DR requirements will be.
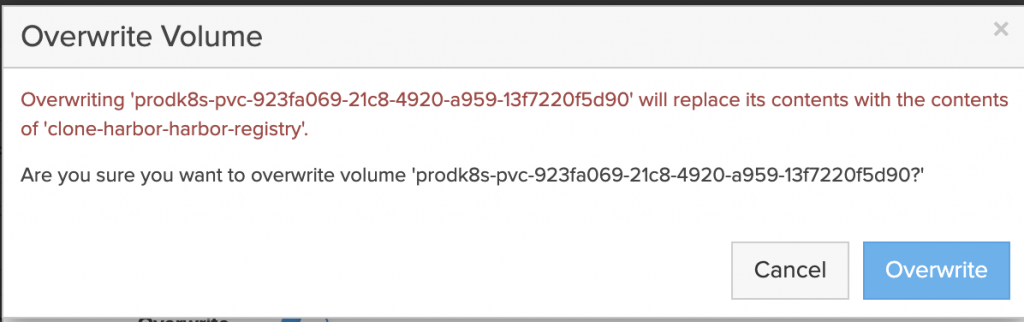
TL;DR – Move Kubernetes volumes from legacy storage to Pure Storage.
So you have an amazing new Pure Storage array in the datacenter or in public cloud. The Container Storage Interface doesn’t provide a built in way to migrate data between backend devices. I previously blogged about a few ways to clone and migrate data between clusters but the data has to already be located on a Pure FlashArray.
Lately, Pure has been working with a new partner Kasten. While more is yet to come. Check out this demo (just 5:30) and see just how easy it is to move PVC’s while maintaining the config of the rest of the k8s application.
Demo EBS to CBS (this could be used to migrate off other devices too)
This demo used EKS in AWS for the Kubernetes cluster.
Application initially installed using a PVC for MySQL on EBS.
Kasten is used to backup the entire state of the app with the PVC to S3. This target could be a FlashBlade in your datacenter.
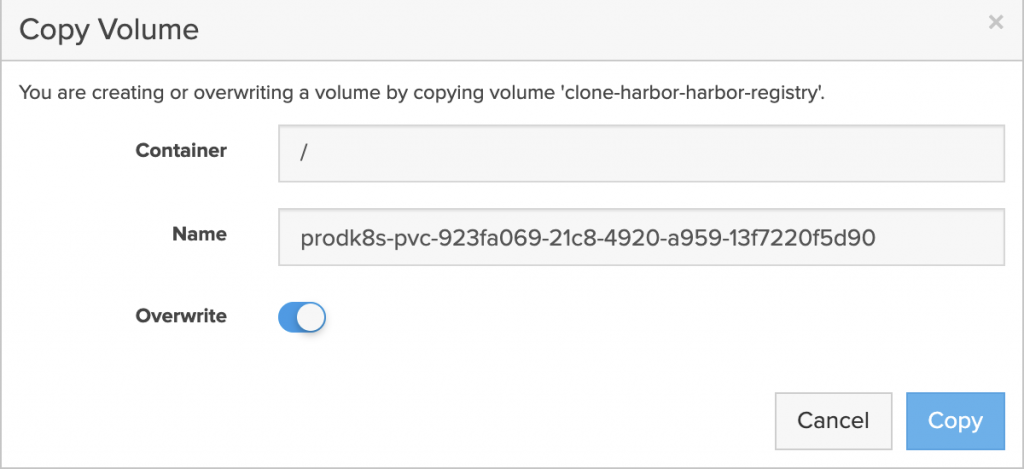
The application is restored to the same namespace but a Kasten Transform is used to convert the PVC to the “pure-block” StorageClass.
Application is live and using PSO for the storage on Cloud Block Store.
Why
Like the book says, “End with why”. Ok maybe it doesn’t actually say that. Let’s answer the “why should I do this?”
First: Why move EBS to CBS This PVC is 10GB on EBS. At this point in time it consumes about 30MB. How much does the AWS bill on the 10GB EBS volume? 10GB. On Cloud Block Store this data is reduced (compressed and deduped) and thin provisioned. How much is on the CBS? 3MB in this case. Does this make sense for 1 or 2 volumes? Nope. If your CIO has stated “move it all to the cloud!” This can be a significant savings on overall storage cost.
Second: Why move from (some other thing) to Pure? I am biased to PSO for Kubernetes so I will start there and then give a few bullets of why Pure, but this isn’t the sales pitch blog. Pure Service Orchestrator allows you a simple single line to install and begin getting storage on demand for your container clusters. One customer says, “It just works, we kind of forget it is there.” and another commented, “I want 100GB of storage for my app, and everything else is automated for me.”
Why Pure?
Efficiency – Get more out of the all-flash, higher dedupe with no performance penalty does matter.
Availability – 6×9’s uptime measured across our customer base, not an array in a validation lab. Actual customers love us.
TL;DR – EBS Volumes fail to mount when multipathd is installed on EKS worker nodes.
EKS and PSO Go Great together!
AWS Elastic Kubernetes Service is a great way to dive in with managed Kubernetes in the cloud. Pure Service Orchestrator integrates EKS worker nodes into the Cloud Block Store on AWS. I created this ansible playbook to make sure the right packages and services are started on my worker nodes.
In my previous testing with PSO and EKS I was basically focused on using PSO only. Recently the use case of migrating from EBS to CBS has shown to be pretty valuable to our customers in the cloud. To create the demo I used an app I often use for demoing PSO. It is 2 Web server containers attached to a mySQL container with a persistent volume. Very easy. I noticed though as I was using the built in gp2 Storage Class it started behaving super odd after I installed PSO. I installed the AWS EBS CSI driver. Same thing. It could not mount volumes or snapshot them in EBS. PSO volumes on CBS worked just fine. I figure most customers don’t want me to break EBS.
After digging around the internet and random old Github issues there was no one thing seemingly having the same issue. People were having problems that had like 1 of the 4 symptoms. I decided to test when in my process it broke after I enabled the package device-mapper-multipath. So it wasn’t PSO as much as a very important pre-requisite to PSO causing the issue. What it came down to is the EBS volumes were getting grabbed by multipathd and the Storage Class didn’t know how to handle the different device names. So I had to find how to use multipathd for just the Pure volumes. The right settings in multipath.conf solved this. This is what I used as an example:
I am telling multipathd to ignore everything BUT Pure. This solved my issue. So I saved this into the local directory and added the section in the ansible playbook to copy that file to each worker node in EKS. 1. Copy the ansible playbook above to a file prereqs.yaml 2. Copy the above multipath blacklist settings to multipath.conf and save to the same directory as prereqs.yaml 3. Run the ansible playbook as shown below. (make sure the inventory.ini has IP’s and you have the SSH key to login to each worker node.
# Make sure inventory.ini has the ssh IP's of each node.
# prereqs.yaml includes the content from above

ansible-playbook -i inventory.ini -b -v prereqs.yaml -u ec2-user
This will install the packages, copy multipath.conf to /etc and restart the services to make sure they pick up the new config.
The latest version of the CSI enabled Pure Service Orchestrator is now available. Snaps and Clones for Persistent Volume Claims enables use cases for K8s clusters to now move data between apps and environments. Need to make instant database copies for dev or test? Super easy now.
Since this feature leverages the capabilities of the FlashArray the clones and snaps have zero performance penalty and only consume globally new blocks on the underlying array (saves a ton of space when you make a lot of copies).
Make sure to read more on the Pure Service Orchestrator github repo on what needs to be done to enable these features in your k8s cluster. See below for more information.
For snapshot feature, ensure you have Kubernetes 1.13+, the feature gate is enabled via the following Kubernetes feature flag: --feature-gates=VolumeSnapshotDataSource=true
For clone feature, ensure you have Kubernetes 1.15+, Ensure the feature gate is enabled via the following Kubernetes feature flag: --feature-gates=VolumePVCDataSource=true
I am excited to be at Kubecon yet again. I think this is my third time. Pure Storage will be in booth S92, come by and see some demos of our CSI plugin. Automating persistent storage is still big need for many K8s clusters. Pure can make it simple, scalable and highly available.
I will be at the booth and around a few sessions so please come and say hello.
Also, ask my all about how Pure will support K8s on VMware in all its various forms.
Come by the booth, see a demo, get a turtle approved reusable straw. Enter to win some cool things.
Sometimes I have to look up information and I think that is so simple I shouldn’t blog about it. Then I think I should share the link so if anyone else finds it, I might be helpful. Today the 2nd one wins.
I just want to note that the alarm comes at like 180 days, which is super nice but the renewed cert is only good for 364 more days. This can not be changed right now. I suggest though for the ease of use renew the certificate before it expires to avoid extra work.