One of the great new features of PSO 6 is ability to create a storage class with a pre-defined limit on IO or bandwidth (or both). Watch the following short demo to check it out.
Now if you used any of the old versions of PSO you know it can smart provision across Pure Storage arrays with a single storageClass for block and one for file. Today I am proud to share the mysterious and sometimes confusing third storageClass pure is no longer installed with PSO 6. The long story is that storage class was to support legacy systems that use the 1.0 version of our driver. There has been 2.5 years to get used to pure-block. So now with the upgrade you can make the right choice.
jowings@asgard ~/pso-values k get sc
NAME PROVISIONER RECLAIMPOLICY VOLUMEBINDINGMODE ALLOWVOLUMEEXPANSION AGE
pure-block pure-csi Delete Immediate true 56s
pure-file pure-csi Delete Immediate true 56s
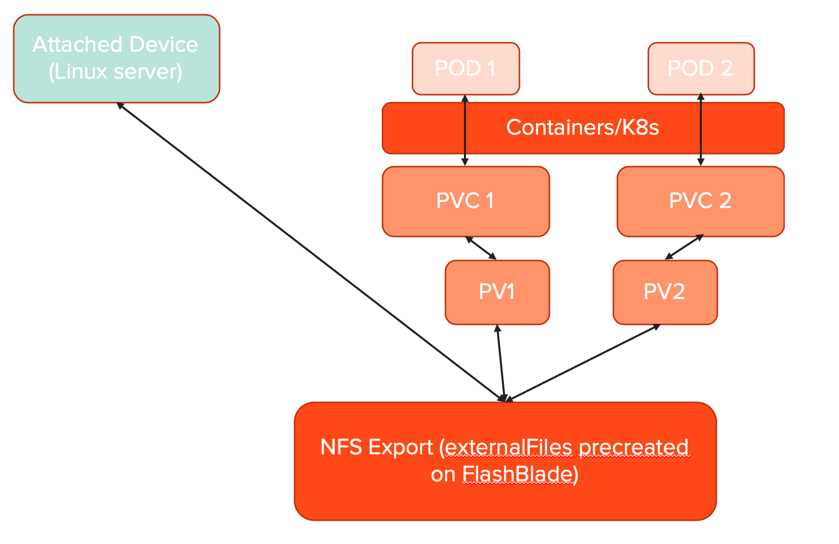
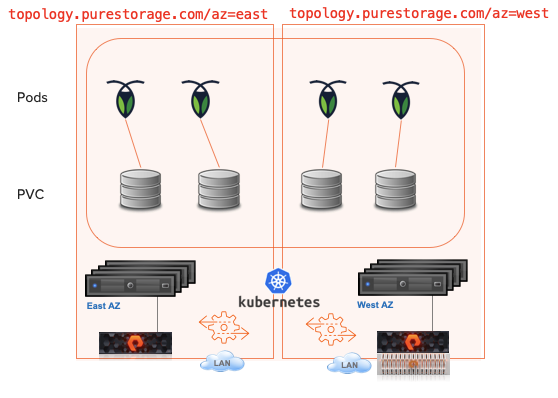
I want to attach to a share that is already used by a physical server or some other device. I also want to attach containers that are orchestrated by K8s. This scenario is one customers have been asking for since the first version of Pure Service Orchestrator. When you normally create a PVC the PSO provisioner creates a volume or filesystem that looks something like this:
The first version of PSO’s FlexVolume Driver supported an import feature but it would take an existing volume and rename it to something like in the screenshot above. With the new “soft import” feature now in the latest PSO CSI driver you can now create a PVC tied to any existing volume and it won’t rename it. So any external connections or applications are not interrupted. How can you do this?
apiVersion: v1
kind: PersistentVolume
metadata:
  annotations:
    pv.kubernetes.io/provisioned-by: pure-csi
  name: pv-import
spec:
  accessModes:
  - ReadWriteOnce
  capacity:
    storage: 1Ti
  claimRef:
    apiVersion: v1
    kind: PersistentVolumeClaim
    # TODO: change to the PVC you want to bind this PV.
    # If you don't pre-bind PVC here, the PV might be automatically bound to a PVC by scheduler.
    name: pvc-import1
    # Namespace of the PVC
    namespace: app1
  csi:
    driver: pure-csi
    # TODO: change to the volume name in backend.
    # Volume with any name that exists in backend can be imported, and will not be renamed.
    volumeHandle: externalfiles
    volumeAttributes:
      backend: file
  # TODO: configure your desired reclaim policy,
  # Use Retain if you don't want your volume to get deleted when the PV is deleted.
  persistentVolumeReclaimPolicy: Retain
  storageClassName: pure-file
  volumeMode: Filesystem
Very Important Note: persistentVolumeReclaimPolicy is set to Retain. This ensures the filesystem is not deleted if the PV is deleted.
Notice the externalfiles volumeHandle matches the filesystem already in use on the FlashBlade.
3. Now we have to create a PVC to match the namespace and name specified in the PV.
apiVersion: "v1"
kind: "PersistentVolumeClaim"
metadata:
  name: pvc-import1
spec:
  accessModes:
    - "ReadWriteOnce"
  resources:
    requests:
      storage: "1Ti"
  # Note: These two fields are not required for pre-bound PV.
  storageClassName: pure-file
  volumeMode: Filesystem

  # TODO: Change to the name of the imported PV.
  volumeName: pv-import
Notice the volumeName matches the PV we created earlier.
Now your Pod can mount the PVC. Even if it is already mounted. For that kind of multi-attach NFS is required.
Coming July 14 at 12 EST or 9am PST there will be a combined Kasten and Pure webinar about Kubernetes backup and mobility. As you are working on providing the expected levels of enterprise grade backup and recovery for you k8s based applications this will be a great webinar to help you learn more about what you can use to fill those requirements. Register here:
TL;DR – Move Kubernetes volumes from legacy storage to Pure Storage.
So you have an amazing new Pure Storage array in the datacenter or in public cloud. The Container Storage Interface doesn’t provide a built in way to migrate data between backend devices. I previously blogged about a few ways to clone and migrate data between clusters but the data has to already be located on a Pure FlashArray.
Lately, Pure has been working with a new partner Kasten. While more is yet to come. Check out this demo (just 5:30) and see just how easy it is to move PVC’s while maintaining the config of the rest of the k8s application.
Demo EBS to CBS (this could be used to migrate off other devices too)
This demo used EKS in AWS for the Kubernetes cluster.
Application initially installed using a PVC for MySQL on EBS.
Kasten is used to backup the entire state of the app with the PVC to S3. This target could be a FlashBlade in your datacenter.
The application is restored to the same namespace but a Kasten Transform is used to convert the PVC to the “pure-block” StorageClass.
Application is live and using PSO for the storage on Cloud Block Store.
Why
Like the book says, “End with why”. Ok maybe it doesn’t actually say that. Let’s answer the “why should I do this?”
First: Why move EBS to CBS This PVC is 10GB on EBS. At this point in time it consumes about 30MB. How much does the AWS bill on the 10GB EBS volume? 10GB. On Cloud Block Store this data is reduced (compressed and deduped) and thin provisioned. How much is on the CBS? 3MB in this case. Does this make sense for 1 or 2 volumes? Nope. If your CIO has stated “move it all to the cloud!” This can be a significant savings on overall storage cost.
Second: Why move from (some other thing) to Pure? I am biased to PSO for Kubernetes so I will start there and then give a few bullets of why Pure, but this isn’t the sales pitch blog. Pure Service Orchestrator allows you a simple single line to install and begin getting storage on demand for your container clusters. One customer says, “It just works, we kind of forget it is there.” and another commented, “I want 100GB of storage for my app, and everything else is automated for me.”
Why Pure?
Efficiency – Get more out of the all-flash, higher dedupe with no performance penalty does matter.
Availability – 6×9’s uptime measured across our customer base, not an array in a validation lab. Actual customers love us.
TL;DR – EBS Volumes fail to mount when multipathd is installed on EKS worker nodes.
EKS and PSO Go Great together!
AWS Elastic Kubernetes Service is a great way to dive in with managed Kubernetes in the cloud. Pure Service Orchestrator integrates EKS worker nodes into the Cloud Block Store on AWS. I created this ansible playbook to make sure the right packages and services are started on my worker nodes.
In my previous testing with PSO and EKS I was basically focused on using PSO only. Recently the use case of migrating from EBS to CBS has shown to be pretty valuable to our customers in the cloud. To create the demo I used an app I often use for demoing PSO. It is 2 Web server containers attached to a mySQL container with a persistent volume. Very easy. I noticed though as I was using the built in gp2 Storage Class it started behaving super odd after I installed PSO. I installed the AWS EBS CSI driver. Same thing. It could not mount volumes or snapshot them in EBS. PSO volumes on CBS worked just fine. I figure most customers don’t want me to break EBS.
After digging around the internet and random old Github issues there was no one thing seemingly having the same issue. People were having problems that had like 1 of the 4 symptoms. I decided to test when in my process it broke after I enabled the package device-mapper-multipath. So it wasn’t PSO as much as a very important pre-requisite to PSO causing the issue. What it came down to is the EBS volumes were getting grabbed by multipathd and the Storage Class didn’t know how to handle the different device names. So I had to find how to use multipathd for just the Pure volumes. The right settings in multipath.conf solved this. This is what I used as an example:
I am telling multipathd to ignore everything BUT Pure. This solved my issue. So I saved this into the local directory and added the section in the ansible playbook to copy that file to each worker node in EKS. 1. Copy the ansible playbook above to a file prereqs.yaml 2. Copy the above multipath blacklist settings to multipath.conf and save to the same directory as prereqs.yaml 3. Run the ansible playbook as shown below. (make sure the inventory.ini has IP’s and you have the SSH key to login to each worker node.
# Make sure inventory.ini has the ssh IP's of each node.
# prereqs.yaml includes the content from above

ansible-playbook -i inventory.ini -b -v prereqs.yaml -u ec2-user
This will install the packages, copy multipath.conf to /etc and restart the services to make sure they pick up the new config.
How to Upgrade your PSO FlexDriver deployment to the latest CSI-based driver
Smart Provisioning with PSO
Over the past few months, the Kubernetes FlexDriver codebase has been deprecated and there is a solid shift towards using CSI-based drivers for providing Persistent Volumes to Kubernetes environments.
I’m not going to address the reasons behind that shift here, but suffice to say that all the major storage providers are now using the CSI specification for their persistent storage drivers in Kubernetes.
This is great, but what about those early adopters who installed FlexDriver based drivers?
It’s not the easiest thing to migrate the control of a persistent volume from one driver to another, in fact, it is practically impossible unless you are a Pure Storage customer and are using PSO.
With the latest release of PSO, ie 5.2.0, there is now a way to migrate your PSO FlexDriver created volumes under the control of the PSO CSI driver.
It’s still not simple and it’s a little time consuming, and you do need an outage for your application, but it is possible.
Simply (sic), these are the steps you need to undertake to perform your migration:
Scale down your applications so that no pods are using the FlexDriver managed PVCs and PVs.
Uninstall your FlexDriver – don’t worry all your PVs and PVCs will remain and the applications using them won’t notice.
Install the CSI based driver – now all new PVs will be managed by this new driver.
Identify your PVs that were created by the FlexDriver.
Patch the PV definition to ensure it doesn’t get automatically deleted by Kubernetes.
Delete the PVC and then the PV – sounds scary, but the previous patch command means that underlying volume on the backend storage is retained
Import the storage volume back into Kubernetes and under the CSI drivers control – this is where you need PSO v5.2.0 or higher…
Scale back up your applications.
Well that was easy, wasn’t it?
More details on exactly how to perform the steps above are detailed in the PSO GitHub repository documentation.
Now, you may feel a little paranoid about these deletion commands you are running against your precious data, so as a “belt and braces” type activity, you could always make a clone or a snapshot of your underlying storage volumes on your array before you do step 6. But remember to delete these clones when you have completed the migration.
Please welcome Simon making a guest appearance to go through whatever it is this is about. 🙂 – Jon
Got to love those TLAs!!
To demystify the title of this blog, this will be about installing Pure Service Orchestrator (PSO) with Docker Kubernetes Service (DKS).
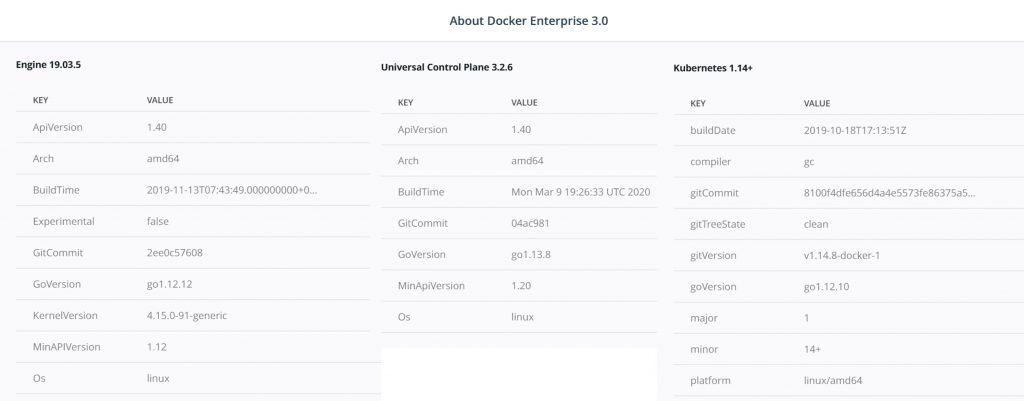
Specifically, I’ll be talking about PSO CSI driver v5.0.8, running with Docker EE 3.0 and the Universal Control Plane (UCP) 3.2.6, managing Kubernetes 1.14.8.
Let’s assume you have Docker Enterprise 3.0 installed on 3
Linux nodes, in my case they are running Ubuntu 18.04. You decide you want them to all run the Docker
Kubernetes Service (DKS) and have any persistent storage provided by your Pure
Storage FlashArray or FlashBlade – how do you go about installing all of these
and configuring them?
Pre-Requisites
As we are going to be using PSO with Pure Storage array for
the persistent storage, ensure that all nodes that will part of DKS have the
following software installed:
nfs-common
multipath-tools
Install UCP
The first step to getting your DKS environment up is to
install the Docker Universal Control Plane (UCP) from the node you will be
using as your master.
As PSO supports CSI snapshots, you will want to ensure that
when installing UCP, you tell it to open the Kubernetes feature gates, thereby
enabling persistent volumes snapshots through PSO.
If you don’t want to open the feature gates, don’t use the --storage-expt-enabled switch in the install command.
Answer the questions the install asks, wait a few minutes,
and voila you have Docker UCP installed and can access it through its GUI at http://<host IP>. Note that you
may be prompted to enter your Docker EE license key on the first login.
When complete you will have a basic, single node, environment consisting of docker EE 3.0, UCP 3.2.6 and Kubernetes 1.14.8.
Add Nodes to Cluster
Once you have your master node up and running, you can add
your two worker nodes to the cluster.
The first step is to ensure your default scheduler is
Kubernetes, not Swarm. If you don’t set this pods will not run on the worker
nodes due to taints that are applied.
Navigate to your username in the left pane and select Admin
Settings and then Scheduler. Set the default Orchestrator type to
Kubernetes and save your change
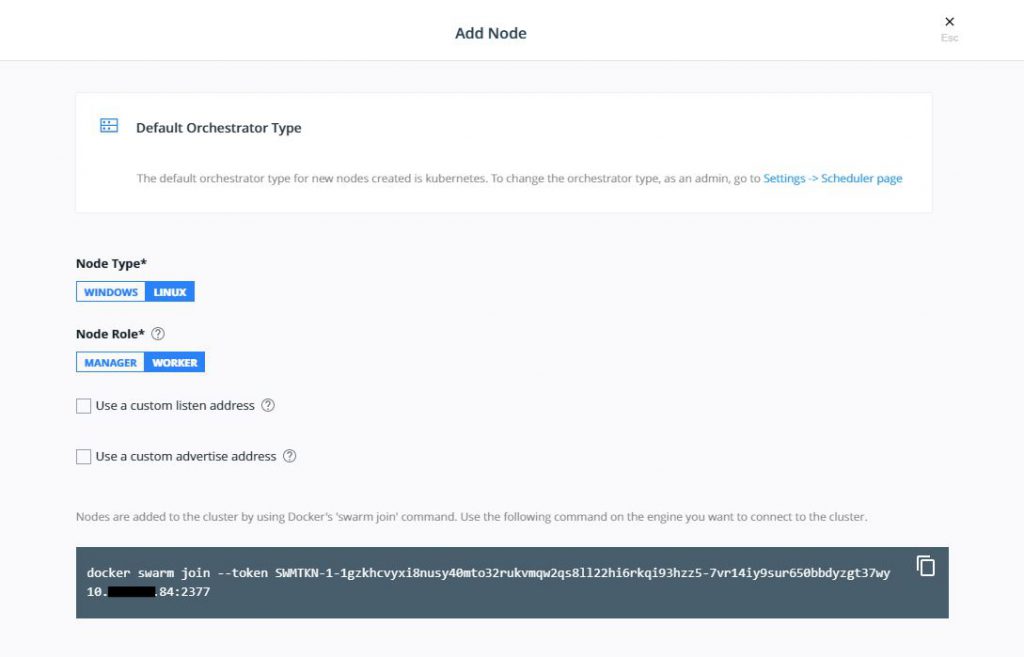
Now to add nodes navigate to Shared Resources and
select Nodes and then Add Nodes. You will see something like
this:
Use the command on each worker node to get them to join the
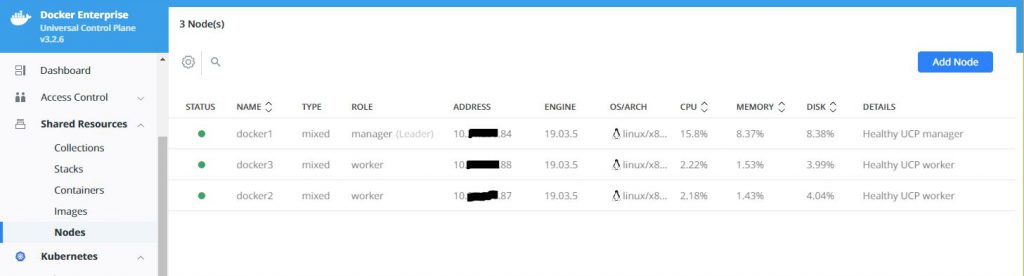
Kubernetes cluster. When complete, your nodes should be correctly joined and
look like this is your Nodes display.
You now have a fully functioning Kubernetes cluster managed
by Docker UCP.
Get your client ready
Before you can install PSO you need to install a Docker
Client Bundle onto your local node that will be used to communicate with your
cluster. I use a Windows 10 laptop, but run the Ubuntu shell provided by
Windows to do this.
To get the bundle, navigate to your user profile, select Client
Bundles and then Generate Client Bundle from the dropdown menu.
Unzip the tar file you get into your working directory.
Next, you need to get the correct kubectl version, which
with UCP 3.2.6 is 1.14.8, by running the following commands:
Check your installation by running the following commands:
# kubectl version
Client Version: version.Info{Major:"1", Minor:"14", GitVersion:"v1.14.8", GitCommit:"211047e9a1922595eaa3a1127ed365e9299a6c23", GitTreeState:"clean", BuildDate:"2019-10-15T12:11:03Z", GoVersion:"go1.12.10", Compiler:"gc", Platform:"linux/amd64"}
Server Version: version.Info{Major:"1", Minor:"14+", GitVersion:"v1.14.8-docker-1", GitCommit:"8100f4dfe656d4a4e5573fe86375a5324771ec6b", GitTreeState:"clean", BuildDate:"2019-10-18T17:13:51Z", GoVersion:"go1.12.10", Compiler:"gc", Platform:"linux/amd64"}
# kubectl get nodes
NAME      STATUS   ROLES   AGE   VERSION
docker1   Ready    master  24h   v1.14.8-docker-1
docker2   Ready    <none>  24h   v1.14.8-docker-1
docker3   Ready    <none>  24h   v1.14.8-docker-1
Now we are nearly ready to install PSO, but PSO requires Helm, so now we install Helm3 (I’m using v3.1.2 here, but check for newer versions) and validate:
# wget https://get.helm.sh/helm-v3.1.2-linux-amd64.tar.gz
# tar -zxvf helm-v3.1.2-linux-amd64.tar.gz
# mv linux-amd64/helm /usr/bin/helm
# helm version
version.BuildInfo{Version:"v3.1.2", GitCommit:"d878d4d45863e42fd5cff6743294a11d28a9abce", GitTreeState:"clean", GoVersion:"go1.13.8"}
And finally…
We are ready to install PSO.. Here we are just going to
follow the instructions in the PSO GitHub repo, so check in their for updates
if you are reading this in my future…
# helm repo add pure https://purestorage.github.io/helm-charts
# helm repo update
So the latest version at this time is 5.0.8, so we should
get the values.yaml
configuration file that matches this version…
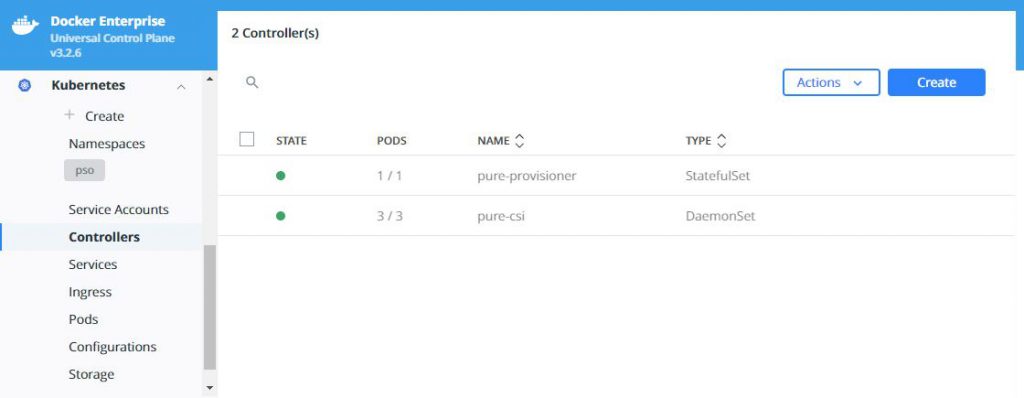
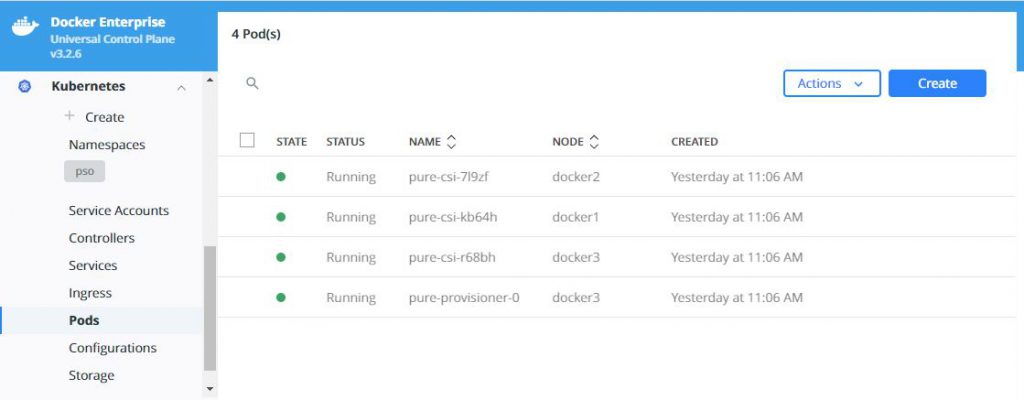
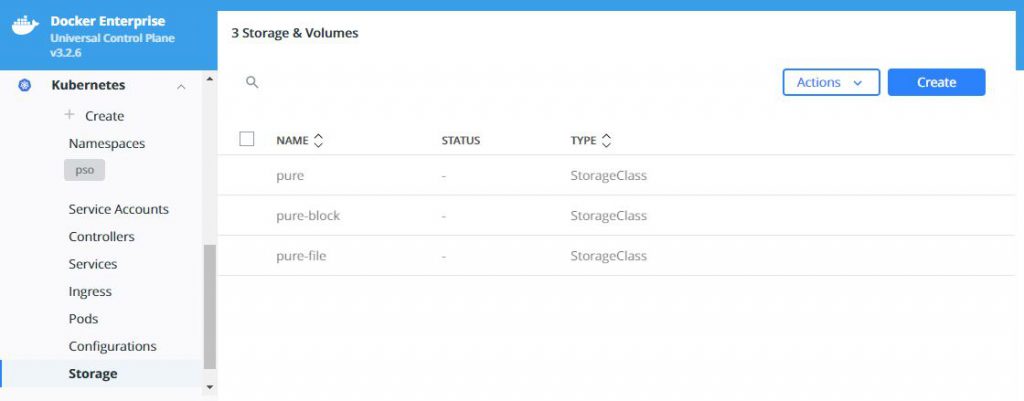
What does this look like in Docker UCP you ask, well this is
what you will see in various screens:
Now you can start using PSO to provide your persistent
storage to your containerized applications, and if you enabled the
feature-gates as suggested at the start of this blog, you could also take
snapshots of your PVs and restore these to new volumes. For details on exactly
how to do this read this: https://github.com/purestorage/helm-charts/blob/5.0.8/docs/csi-snapshot-clones.md,
but make sure you install the VolumeSnapshotClass first wit this command:
The version of Kubernetes provided in Docker UCP 3.2.6 does not support volume
cloning, but future releases may enable this functionality – check with Docker
UCP and Docker EE release notes.