Ephemeral or Persistent? The Storage Choices for Containers (Part 3)

In this, the final part of a 3-part series, I cover the latest developments in ephemeral storage. Part 1 covered traditional ephemeral storage and Part 2 covered persistent storage.

CSI Ephemeral Storage

With the release of Kubernetes 1.15, there came the ability for CSI drivers that support this feature, the ability to create ephemeral storage for pods using storage provisioned from external storage platforms. Within 1.15 a feature gate needed to be enabled to allow this functionality, but with 1.16 and the beta release of this feature, the feature gate defaulted to true.

Conceptually CSI ephemeral volumes are the same as emptyDir volumes that were discussed above, in that the storage is managed locally on each node and is created together with other local resources after a Pod has been scheduled onto a node. It is required that volume creation has to be unlikely to fail, otherwise, the pod gets stuck at startup. 

These types of ephemeral volumes are currently not covered by the storage resource usage limits of a Pod, because that is something that kubelet can only enforce for storage that it manages itself and not something provisioned by a CSI provisioner. Additionally, they do not support any of the advanced features that the CSI driver might provide for persistent volumes, such as snapshots or clones.

To identify if an installed CSI supports ephemeral volumes just run the following command and check supported modes:

# kubectl get csidriver
NAME       ATTACHREQUIRED   PODINFOONMOUNT   MODES                  AGE
pure-csi   true             true             Persistent,Ephemeral   28h

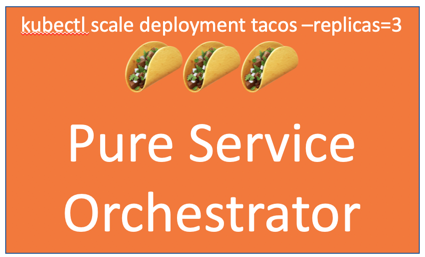
With the release of Pure Service Orchestrator v6.0.4, CSI ephemeral volumes are now supported by both FlashBlade and FlashArray storage. 

The following example shows how to create an ephemeral volume that would be included in a pod specification:

 volumes:
  - name: pure-vol
    csi:
      driver: pure-csi
      fsType: xfs
      volumeAttributes:
        backend: block
        size: "2Gi"

This volume is to be 2GiB in size, formatted as xfs and be provided from a FlashArray managed by Pure Service Orchestrator.

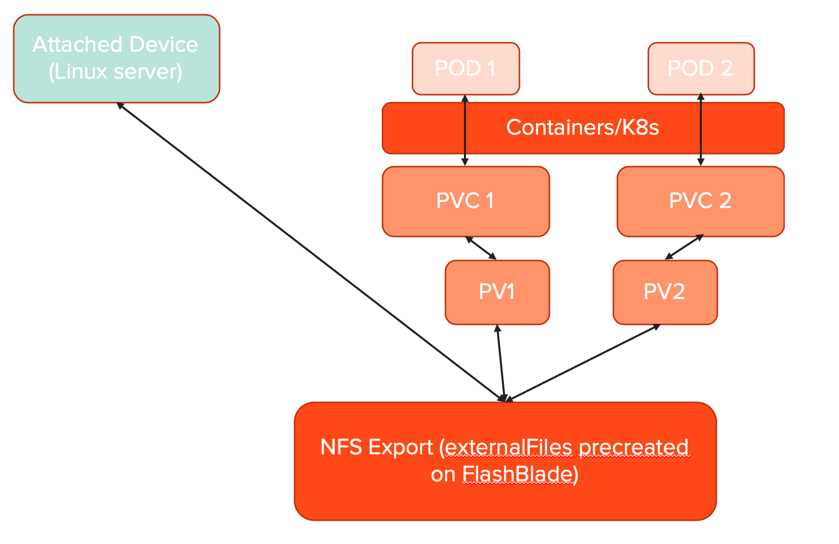
Even though these CSI ephemeral volumes are created as real volumes on storage platforms, they are not visible to Kubernetes other than in the description of the pod using them. There are no associated Kubernetes objects and are not persistent volumes and have no associated claims, so these are not visible through the kubectl get pv or kubectl get pvc commands.

When implemented by Pure Storage Orchestrator the name of the actual volume created on either a FlashArray or FlashBlade does not match the PSO naming convention for persistent volumes.

A persistent volume has the naming convention of:

<clusterID>-pvc-<persistent volume uid>

Whereas a CSI ephemeral volumes naming convention is:

<clusterID>-<namespace>-<podname>-<unique numeric identifier>

Generic Ephemeral Storage

For completeness, I thought I would add the next iteration of ephemeral storage that will become available.

With Kubernetes 1.19 the alpha release of Generic Ephemeral Volumes was made available, but you do need to enable a feature gate for this feature to be capable.

These next generation of ephemeral volumes will again be similar to emptyDir volumes but with more flexibility, 

It is expected that the typical operations on volumes that are implementing by the driver will be supported, including snapshotting, cloning, resizing, and storage capacity tracking.

Conclusion

I hope this series of posts have been useful and informative. 

Storage for Kubernetes has been through many changes over the last few years and this process shows no sign of stopping. More features and functionality are already being discussed in the Storage SIGs and I am excited to see what the future brings to both ephemeral and persistent storage for the containerized world.

Ephemeral or Persistent? The Storage Choices for Containers (Part 2)

In this, the second part of a 3-part series, I cover persistent storage. Part 1 covered traditional ephemeral storage.

Persistent Storage

Persistent storage as the name implies is storage that can maintain the state of the data it holds over the failure and restart of an application, regardless of the worker node on which the application is running. It is also possible with persistent storage to keep the data used or created by an application after the application has been deleted. This is useful if you need to reutilize the data in another application, or as enable the application to restart in the future and still have the latest dataset available. You can also leverage persistent storage to allow for disaster recovery or business continuity copies of the dataset. 

StorageClass

A construct in Kubernetes that has to be understood for storage is the StorageClass. A StorageClass provides a way for administrators to describe the “classes” of storage they offer. Different classes might map to quality-of-service levels, or different access rules, or any arbitrary policies determined by the cluster administrators.

Each CSI storage driver will have a unique provisioner that is assigned as an attribute to a storage class and instructs any persistent volumes associated with that storage class to use the named provisioner, or CSI driver when provisioning the underlying volume on the storage platform.

Provisioning

Obtaining persistent storage for a pod is a three-step process:

  1. Define a PersistentVolume (PV), which is the disk space available for use
  2. Define a PersistentVolumeClaim (PVC), which claims usage of part or all of the PersistentVolume disk space
  3. Create a pod that references the PersistentVolumeClaim

In modern-day CSI drivers, the first two steps are usually combined into a single task and this is referred to as dynamic provisioning. Here the PersistentVolumeClaim is 100% if the PersistentVolume and the volume will be formatted with a filesystem on first attachment to a pod.

Manual provisioning can also be used with some CSI drivers to import existing volumes on storage devices into the control of Kubernetes by converting the existing volume into a PersistentVolume. In this case, the existing filesystem on the original volume is kept with all existing data when first mounted to the pod. An extension of this is the ability to import a snapshot of an existing volume, thereby creating a full read-write clone of the source volume the snapshot derived from.

When a PV is created it is assigned a storageClassName attribute and this class name controls many attributes of the PV as mentioned earlier. Note that the storageClassName attribute ensures the use of this volume to only the PVCs that request the equivalent StorageClass. In the case of dynamic provisioning, this is all managed automatically and the application only needs to call the required StorageClass the PVC wants storage from and the volume is created and then bound to a claim.

When the application is complete or is deleted, depending on the way the PV was initially created, the underlying volume construct can either be deleted or retained for use by another application, or a restart of the original application. This is controlled by the reclaimPolicy in the storageClass definition. In dynamic provisioning the normal setting for this is delete, meaning that when the PVC is deleted the associated PV is deleted and the underlying storage volume is also deleted. 

By setting the reclaimPolicy to retain this allows for manual reclamation of the PV.

On deletion of the PVC, the associated PV is not deleted and can be reused by another PVC with the same name as the original PVC. This is the only PVC that can access the PV and this concept is used a lot with StatefulSets.

It should be noted that when a PV is retained a subsequent deletion of the PV will result in the underlying storage volume NOT being deleted, so it is essential that a simple way to ensure orphaned volumes do not adversely affect your underlying storage platforms capacity.

At this point, I’d like to mention Pure Service Orchestrator eXplorer which is an Open Source project to provide a single plane of glass for storage and Kubernetes administrator to visualize how Pure Service Orchestrator, the CSI driver provided by Pure Storage, is utilising storage. One of the features of PSOX is its ability to identify orphaned volumes from a Kubernetes cluster.

Persistent Volume Granularity

There are a lot of options available when it comes to how the pod can access the persistent storage volume and these are controlled by Kubernetes. These different options are normally defined with a storageClass.

The most common of these is the accessMode which controls how the data in the PV can be accessed and modified. There are three modes available in Kubernetes:

  • ReadWriteMany (RWX) – the volume can be mounted as read-write by many nodes
  • ReadWriteOnce (RWO) – the volume can be mounted as read-write by a single node
  • ReadOnlyMany (ROX) – the volume can be mounted read-only by many nodes

Additional controls for the underlying storage volume can be provided through the storageClass include mount options, volume expansion, binding mode which is usually used in conjunction with storage topology (also managed through the storageClass). 

A storageClass can also apply specific, non-standard, granularity for different features a CSI driver can support.

In the case of Pure Service Orchestrator, all of the above-mentioned options are available to an administrator creating storage classes, plus a number of the non-standard features.

Here is an example of a storageClass definition configured to use Pure Service Orchestrator as the CSI provisioner:

apiVersion: storage.k8s.io/v1
kind: StorageClass
metadata:
  name: example
provisioner: pure-csi
parameters:
  iops_limit: "30000"
  bandwidth_limit: "10G"
  backend: block
  csi.storage.k8s.io/fstype: xfs
  createoptions: -q
mountOptions:
  - discard
allowedTopologies:
  - matchLabelExpressions:
      - key: topology.purestorage.com/rack
        values:
          - rack-0
          - rack-1
allowedVolumeExpansion: true

This might look a little complex, but simplistically this example ensures that PersistentVolumes created through this storageClass will have the following attributes:

  • Quality of Service limits of 10Gb/s bandwidth and 30k IOPs
  • Volumes are capable of being expended in size
  • One first use by a pod the volume will be formatted with the xfs filesystem and mounted with the discard flag
  • The volume will only be created by an underlying FlashArray found in either rack-0 or rack-1 (based on labels defined in the PSO configuration file)

Pure Service Orchestrator even allows the parameters setting to control the NFS ExportRules of PersistentVolumes created on a FlashBlade.

Check back for Part 3 of this series, where I’ll discuss the latest developments in ephemeral storage in Kubernetes.

Ephemeral or Persistent? The Storage Choices for Containers (Part 1)

In this series of posts, I’ll cover the difference between ephemeral and persistent storage as far as Kubernetes containers are concerned and discuss the latest developments in ephemeral storage. I’ll also occasionally mention Pure Service Orchestrator™ to show how this can provide storage to your applications do matter what type is required.

Back in the mists of time when Kubernetes and containers, in general, were young storage was only ephemeral. There was no concept of persistency for your storage and the applications running in container environments were inherently ephemeral themselves and therefore there was no need for data persistency.

Initially, with the development of FlexDriver plugins and lately CSI compliant drivers, persistent storage has become a mainstream offering to enable applications that need or require state for their data. Persistent storage will be covered in the second blog in this series.

Ephemeral Storage

Ephemeral storage can come from several different locations, the most popular and simplest being emptyDir. This is, as the name implies, an empty directory mounted in the container that can be accessed by one or more pods in the container. When the container terminates, whether that be cleanly or through a failure event, the mounted emptyDir storage is erased and all its contents are lost forever. 

emptyDir

You might wonder where this “storage” used by emptyDir comes from and that is a great question. It can come from one of two places. The most common is actually from the actual physical storage available to the Kubernetes nodes running the container, usually from the root partition. This space is finite and completely dependent on the available free capacity of the disk partition the directory is present on. This partition is also used for lots of other dynamic data, such as container logs, image layers, and container-writable layers, so it is potentially an ever-decreasing resource.

To create this type of ephemeral storage for a pod(s) running in a container, ensure the pod specification has the following section:

 volumes:
  - name: demo-volume
    emptyDir: {}

Note that the {} states that we are not providing any further requirements for the ephemeral volume. The name parameter is required so that pods can mount the emptyDir volume, like this:

   volumeMounts:
    - mountPath: /demo
      name: demo-volume

If multiple pods are running in the container they can all access the same emptyDir if they mount the same volume name.

From the pods perspective, the emptyDir is a real filesystem mapped to the root partition, which is already part utilised, so you will see it in a df command, executed in the pod, as follows (this example has the pod running on a Red Hat CoreOS worker node):

# df -h /demo
Filesystem                Size      Used Available Use% Mounted on
/dev/mapper/coreos-luks-root-nocrypt
                        119.5G     28.3G     91.2G  24% /demo

If you want to limit the size of your ephemeral storage this can be achieved by adding resource limits to the container in the pod as follows:

      requests:
        ephemeral-storage: "2Gi"
      limits:
        ephemeral-storage: "4Gi"

Here the container has requested 2GiB of local ephemeral storage, but the container has a limit of 4GiB of local ephemeral storage.

Note that if you use this method and you exceed the ephemeral-storage limits value the Kubernetes eviction manager will evict the pod, so this is a very aggressive space limit enforcement method.

emptyDir from RAM

There might be instances that you only need a minimal scratch space area for your emptyDir and you don’t want to use any of the root partition. In this case, resources permitting, you can create this in RAM. The only difference in the creation of the emptyDir is that more information is passed during its creation in the pod specification as follows:

 volumes:
  - name: demo-volume
    emptyDir:
      medium: Memory

In this case, the default size of the mounted directory is half of the RAM the running node has and is mounted on tmpfs. For example, here the worker node has just under 32GB of RAM and therefore the emptyDir is 15.7GB, about half:

# df -h /demo
Filesystem                Size      Used Available Use% Mounted on
tmpfs                    15.7G         0     15.7G   0% /demo

You can use the concept of sizeLimit for the RAM-based emptyDir but this does not work as you would expect (at the time of writing). In this case, the sizeLimit is used by the Kubernetes eviction manager to evict any pods that exceed the sizeLimit specified in the emptyDir

Check back for Part 2 of this series, where I’ll discuss persistent storage in Kubernetes.

QoS with Pure Service Orchestrator v6 to keep apps from running amok

One of the great new features of PSO 6 is ability to create a storage class with a pre-defined limit on IO or bandwidth (or both). Watch the following short demo to check it out.

QoS on PSO 6

More information can be found here in the PSO 6 documentation. https://github.com/purestorage/pso-csi/blob/master/docs/csi-qos-control.md

A quick sample

kind: StorageClass
apiVersion: storage.k8s.io/v1
metadata:
  name: pure-block-gold
  labels:
    kubernetes.io/cluster-service: "true"
provisioner: pure-csi
parameters:
  #TODO: choose limits
  iops_limit: "30000"
  bandwidth_limit: "10G"
  backend: block
  csi.storage.k8s.io/fstype: xfs
  createoptions: -q
allowVolumeExpansion: true

Kubernetes PVC mounted by External Devices

I want to attach to a share that is already used by a physical server or some other device. I also want to attach containers that are orchestrated by K8s. This scenario is one customers have been asking for since the first version of Pure Service Orchestrator. When you normally create a PVC the PSO provisioner creates a volume or filesystem that looks something like this:

The first version of PSO’s FlexVolume Driver supported an import feature but it would take an existing volume and rename it to something like in the screenshot above. With the new “soft import” feature now in the latest PSO CSI driver you can now create a PVC tied to any existing volume and it won’t rename it. So any external connections or applications are not interrupted. How can you do this?

  1. Install PSO
  2. Create a PV using the volumeHandle example:
apiVersion: v1
kind: PersistentVolume
metadata:
  annotations:
    pv.kubernetes.io/provisioned-by: pure-csi
  name: pv-import
spec:
  accessModes:
  - ReadWriteOnce
  capacity:
    storage: 1Ti
  claimRef:
    apiVersion: v1
    kind: PersistentVolumeClaim
    # TODO: change to the PVC you want to bind this PV.
    # If you don't pre-bind PVC here, the PV might be automatically bound to a PVC by scheduler.
    name: pvc-import1
    # Namespace of the PVC
    namespace: app1
  csi:
    driver: pure-csi
    # TODO: change to the volume name in backend.
    # Volume with any name that exists in backend can be imported, and will not be renamed.
    volumeHandle: externalfiles
    volumeAttributes:
      backend: file
  # TODO: configure your desired reclaim policy,
  # Use Retain if you don't want your volume to get deleted when the PV is deleted.
  persistentVolumeReclaimPolicy: Retain
  storageClassName: pure-file
  volumeMode: Filesystem

Very Important Note: persistentVolumeReclaimPolicy is set to Retain. This ensures the filesystem is not deleted if the PV is deleted.

Notice the externalfiles volumeHandle matches the filesystem already in use on the FlashBlade.

3. Now we have to create a PVC to match the namespace and name specified in the PV.

apiVersion: "v1"
kind: "PersistentVolumeClaim"
metadata:
  name: pvc-import1
spec:
  accessModes:
    - "ReadWriteOnce"
  resources:
    requests:
      storage: "1Ti"
  # Note: These two fields are not required for pre-bound PV.
  storageClassName: pure-file
  volumeMode: Filesystem

  # TODO: Change to the name of the imported PV.
  volumeName: pv-import

Notice the volumeName matches the PV we created earlier.

Now your Pod can mount the PVC. Even if it is already mounted. For that kind of multi-attach NFS is required.

PSO and “Failed to Log in to Any iSCSI Targets.”

So I create and destroy Kubernetes clusters on vSphere on a pretty regular basis. Some I create with Terraform and Ansible. Some I use PKS. I have a plumbing test for Pure Service Orchestrator that mounts a single volume to a pod on each node.

Every once in a while I get an error like this, on just one node:

Failed to log in to any iSCSI targets! Will not be able to attach volume

In order to make sure it isn’t PSO with the error and it shouldn’t be since the other nodes are working. Run this command:

iscsiadm -m discovery -t st -p 192.168.230.24
iscsiadm: Could not stat /etc/iscsi/nodes//,3260,-1/default to delete node: No such file or directory
 iscsiadm: Could not add/update [tcp:[hw=,ip=,net_if=,iscsi_if=default] 192.168.230.24,3260,1 iqn.2010-06.com.purestorage:flasharray.4ca976f28eb0d479]
 iscsiadm: Could not stat /etc/iscsi/nodes//,3260,-1/default to delete node: No such file or directory
 iscsiadm: Could not add/update [tcp:[hw=,ip=,net_if=,iscsi_if=default] 192.168.230.25,3260,1 iqn.2010-06.com.purestorage:flasharray.4ca976f28eb0d479]
 iscsiadm: Could not stat /etc/iscsi/nodes//,3260,-1/default to delete node: No such file or directory
 iscsiadm: Could not add/update [tcp:[hw=,ip=,net_if=,iscsi_if=default] 192.168.230.26,3260,1 iqn.2010-06.com.purestorage:flasharray.4ca976f28eb0d479]
 iscsiadm: Could not stat /etc/iscsi/nodes//,3260,-1/default to delete node: No such file or directory
 iscsiadm: Could not add/update [tcp:[hw=,ip=,net_if=,iscsi_if=default] 192.168.230.27,3260,1 iqn.2010-06.com.purestorage:flasharray.4ca976f28eb0d479]
 192.168.230.24:3260,1 iqn.2010-06.com.purestorage:flasharray.4ca976f28eb0d479
 192.168.230.25:3260,1 iqn.2010-06.com.purestorage:flasharray.4ca976f28eb0d479
 192.168.230.26:3260,1 iqn.2010-06.com.purestorage:flasharray.4ca976f28eb0d479
 192.168.230.27:3260,1 iqn.2010-06.com.purestorage:flasharray.4ca976f28eb0d479

Now I that isn’t what should be the result. So I thought at first to restart iscsi and that didn’t help. Then I thought, well this is a lab so lets just…

#cd /etc/iscsi
#rm -r nodes

Do not try this if you have other iSCSI targets for other storage. Not sure you will be happy. At first, I thought I should stop iSCSI before doing this. It doesn’t seem to have any effect. Now every node is able to mount and start the pod. Pure Service Orchestrator is trying to mount that volume over and over so it didn’t take long to see everything showing the way I wanted.

NAME                                        READY   STATUS    RESTARTS   AGE
 pure-flex-4zlcq                             1/1     Running   0          12m
 pure-flex-7stfb                             1/1     Running   0          12m
 pure-flex-g2kt2                             1/1     Running   0          12m
 pure-flex-jg5cz                             1/1     Running   0          12m
 pure-flex-n8wkw                             1/1     Running   0          6m34s
 pure-flex-rtsv7                             1/1     Running   0          12m
 pure-flex-vtph2                             1/1     Running   0          12m
 pure-flex-w8x22                             1/1     Running   0          12m
 pure-flex-wqr9k                             1/1     Running   0          12m
 pure-flex-xwbww                             1/1     Running   0          12m
 pure-provisioner-9c8dc9f79-xrq6d            1/1     Running   1          12m
 redis-master-demolocal-1-779f74876c-9k24t    1/1     Running   0          12m
 redis-master-demolocal-10-6695b56f47-zgqc7   1/1     Running   0          12m
 redis-master-demolocal-2-778666b57-5xdh8     1/1     Running   0          6m3s
 redis-master-demolocal-3-84848dfb87-fhj6n    1/1     Running   0          12m
 redis-master-demolocal-4-7c9dfdffb9-6cjv5    1/1     Running   0          12m
 redis-master-demolocal-5-65b555fc79-jjdkl    1/1     Running   0          12m
 redis-master-demolocal-6-6d495bfdf-cb5r2     1/1     Running   0          12m
 redis-master-demolocal-7-5c5db655-fx2qd      1/1     Running   0          12m
 redis-master-demolocal-8-74bc65b8d9-2bt8h    1/1     Running   0          12m
 redis-master-demolocal-9-65dd54c587-zb9p2    1/1     Running   0          12m

Getting Started with Pure Service Orchestrator and Helm

Why Pure Service Orchestrator?

At Pure we have been working hard to develop a way to provide a persistent data layer that is able to meet the expectations of our customers for ease of use and simplicity.  The first iteration of this was the release as the Docker and Kubernetes Plugins.

The plugins provided automated storage provisioning. Which solved a portion of the problem.  All the while, we were working on the service that resided within those plugins. A service that would allow us to bring together managing many arrays. Both block and file.

The new Pure Service Orchestrator will allow smart provisioning over many arrays. On-demand persistent storage for developers placed on the best array or adhering to your policies based on labels.

To install you can use the traditional shell script as described in the readme file here.

The second way that may fit into your own software deployment strategy is using Helm. Since using Helm provides a very quick and simple way to install and it may be new to you the rest of this post will be how to get started with PSO using Helm.

Installing Helm

Please be sure to install Helm using the correct RBAC intructions.

I describe the process in my blog here.

http://54.88.246.86/2018/03/27/getting-started-with-helm-for-k8s/ 

Also, get acquainted with the official Helm documentation at the following site:

https://docs.helm.sh/using_helm/

Once Helm is fully functioning with your Kubernetes cluster run the following commands to setup and Pure Storage Helm repo:

helm repo add pure https://purestorage.github.io/helm-charts
helm repo update
helm search pure-k8s-plugin

Additionally, you need to create a YAML file with the following formate and contents:

arrays:
  FlashArrays:
    - MgmtEndPoint: "1.2.3.4"
      APIToken: "a526a4c6-18b0-a8c9-1afa-3499293574bb"
      Labels:
        rack: "22"
        env: "prod"
    - MgmtEndPoint: "1.2.3.5"
      APIToken: "b526a4c6-18b0-a8c9-1afa-3499293574bb"
  FlashBlades:
    - MgmtEndPoint: "1.2.3.6"
      APIToken: "T-c4925090-c9bf-4033-8537-d24ee5669135"
      NFSEndPoint: "1.2.3.7"
      Labels:
        rack: "7b"
        env: "dev"
    - MgmtEndPoint: "1.2.3.8"
      APIToken: "T-d4925090-c9bf-4033-8537-d24ee5669135"
      NFSEndPoint: "1.2.3.9"
      Labels:
        rack: "6a"

You can run a dry run of the installation if you want to see the output but not change anything on your cluster. It is important to remember the path to the yaml file you created above.

helm install --name pure-storage-driver pure/pure-k8s-plugin -f <your_own_dir>/yourvalues.yaml --dry-run --debug

If you are satisfied with the output of the dry run you can run the install now.

helm install --name pure-storage-driver pure/pure-k8s-plugin -f <your_own_dir>/yourvalues.yaml

Please check the GitHub page hosting the Pure Storage repo for more detail.

https://github.com/purestorage/helm-charts/tree/master/pure-k8s-plugin#how-to-install

Setting the Default StorageClass

Since we do not want to assume you only have Pure Storage in you environment we do not force ‘pure’ as the default StorageClass in Kubernetes.

If you already installed the plugin via helm and need to set the default class to pure run this command.

kubectl patch storageclass pure -p '{"metadata": {"annotations":{"storageclass.kubernetes.io/is-default-class":"true"}}}'

If you have another storage class set to default and you wish to change it to Pure you must first remove the default tag from the other StorageClass and then run the command above. Having two defaults will produce undesired results.  To remove the default tag run this command.

kubectl patch storageclass <your-class-name> -p '{"metadata": {"annotations":{"storageclass.kubernetes.io/is-default-class":"false"}}}'

Read more about these commands from the K8s documentation.

https://kubernetes.io/docs/tasks/administer-cluster/change-default-storage-class/

Demo

Maybe you are a visual learner check out these two demos showing the Helm installation in action.

Updating your Array information

If you need to add a new FlashArray or FlashBlade simply add the information to your YAML file and update via Helm. You may edit the config map within Kubernetes and there are good reasons to do it that way, but for simplicity we will stick to using helm for changes to the array info YAML file. Once your file contains the new array or label run the following command.

helm upgrade pure-storage-driver pure/pure-k8s-plugin -f <your_own_dir>/yourvalues.yaml --set ...

Upgrading using Helm

With the same general process you can use the following command and update the version of Pure Service Orchestrator.

helm upgrade pure-storage-driver pure/pure-k8s-plugin -f <your_own_dir>/yourvalues.yaml --version <target version>

Upgrading from the legacy plugin to the Helm version

Follow the instructions here:

https://github.com/purestorage/helm-charts/tree/master/pure-k8s-plugin#how-to-upgrade-from-the-legacy-installation-to-helm-version

There are a few platform specific considerations you should make if you are using any of the following.

  1. Containerized Kubelet (Some flavors of K8s do this, Rancher and Openshift are two).
  2. CentOS/RHEL Atomic Linux
  3. CoreOS
  4. OpenShift
  5. OpenShift Containerized Deployment

Be certain to read through the notes if you use any of these platform versions.

https://github.com/purestorage/helm-charts/tree/master/pure-k8s-plugin#how-to-upgrade-from-the-legacy-installation-to-helm-version

https://github.com/purestorage/helm-charts/tree/master/pure-k8s-plugin#platform-specific-considerations

Pure Storage Docker Plugin

This is a quick guide and how to install the Pure plugin for docker 1.13 and above. For full details check out Pure Volume Plugin on Store.docker.com.

Requirements


Operating Systems Supported

CentOS Linux 7.3
CoreOS (Ladybug 1298.6.0 and above)
Ubuntu (Trusty 14.04 LTS, Xenial 16.04.2 LTS)
Environments Supported

Docker 1.13+ I am on 17.03-ce
Swarm
Mesos 1.8 and above
Other dependencies

Latest iSCSI initiator SW
Latest Multipath package (This made a difference for me on Ubuntu remember to update!)

Hosts Before

media_1501006005257.png

Here I am just listing the Pure hosts on my array before I install the plugin.

Volumes Before

media_1501006035507.png

Also listing out my volumes, these are all pre-existing.

Pull and Install the plugin (Docker 1.13 and above)

Create /etc/pure-docker-plugin/pure.json

media_1501006093681.png

edit the file pure.json in /etc/pure-docker-plugin and add your array and API token
to get a token from the Pure CLI – (or go to the GUI of the array and copy the API token for your user).


pureeadmin create –api-token [user]
pureadmin list –api-token [user] –expose

Pull the plugin and Install

media_1501006156094.png

docker plugin install store/purestorage/docker-plugin:1.0 –alias pure

Grant the plugins to the directories it requests.

Done. Easy.

For Docker Swarm

Setting the PURE_DOCKER_NAMESPACE variable can be done with the command:

docker plugin set pure PURE_DOCKER_NAMESPACE=<clusterid>

My next blog post will dive more into setting up the plugin with Docker Swarm. The clusterid is just a unique string. Keep it simple.

Test it

media_1501006217870.png

$docker volume create -d pure -o size=200GiB Demo

Remember if you want to create the volume with other units the information is in the README but here it is for now:<Units can be specified as xB, xiB, or x. If no units are specified MiB is assumed.

My host created by the plugin

media_1501006373816.png

Now that I created a volume on the array the host docker01 is now added to the list of hosts. The plugin automates adding the iSCSI IQN and creating the host.

My new volume all ready to go

media_1501006405843.png

You also see the docker01-Demo is listed and sized to my requested 200GiB The PURE_DOCKER_NAMESPACE will prepend the volume name you create. The default will use the docker hostname. In a Mesos and Swarm environment the namespace setting mentioned above is used. This is only identified this way on the array.

Now the volume can be mounted to a container using


#docker run –volume Demo:/data [image] [command]
You could also create a new volume and mount it to a container all in the same line with:


#docker run –volume-driver pure –volume myvolume:/data [image] [command]

UNMAP – Do IT!

Pretty sure my friend Cody Hosterman has talked about this until he turned blue in the face.  Just a point I want to quickly re-iterate here for the record. Run unmap on your vSphere Datastores.

Read this if you are running Pure Storage, but even if you run other arrays (especially all-flash) find a way to do UNMAP on a regular basis:

http://www.codyhosterman.com/2016/01/flasharray-unmap-script-with-the-pure-storage-powershell-sdk-and-poweractions/

Additionally, start to learn the ins-n-outs of vSphere 6 and automatic unmap!

http://blog.purestorage.com/direct-guest-os-unmap-in-vsphere-6-0-2/

Speaking of In-n-out…. I want a double double before I start Whole 30.

in-n-out

Pure ELK Dashboards

Previously I blogged about getting PureELK installed with Docker in just a couple of minutes. After setting up your intitial array’s you may ask what is next?

Loading a preconfigured PureELK Dashboard

media_1450716163834.png

Click load saved dashboard and select one of the Pure Storage dashboards.

media_1452264626343.png

Remember there is a 2nd page page of Dashboards.

Pure Main Dashboard

media_1452264823321.png

Top 10 Volumes

media_1452264957200.png

Alert Audit

media_1452265011249.png

Max vs Average Pure Performance

media_1452265066174.png

Pure Space Analysis

media_1452265121910.png

Space Top – Bar Charts

media_1452265175795.png

Volume List View – Space and Performance

media_1452265229517.png

You can see there are several pre-made dashboards that you can take advantage of. What if you wanted to make your own Dashboard.

Create your Own Dashboard

media_1452265517171.png

To create your own Dashboard:
1. Click the Plus to Add a Visualization
2. Select a visualization
3. Once you have all of your Visualizations added you can click the Save icon and keep your new Dashboard for later use.

Some tips is you can resize and place the visualization anywhere you like on the dashboard. Just remember to click save. Also, You can can use the powerful seach feature to create tables of useful information that you are looking for.