Over the last few months I have been compiling information that I have used to help customers when it comes to PSO. Using Helm and PSO is very simple, but with so many different ways to setup K8s right now it can require a broad knowledge of how plugins work. I will add new samples and work arounds to this Github repo as I come across them. For now enjoy. I have the paths for volume plugins for Kubespray, Kubeadm, Openshift and Rancher version of Kubernetes. Plus some quota samples and even some PSO FlashArray Snapshot and clone examples.
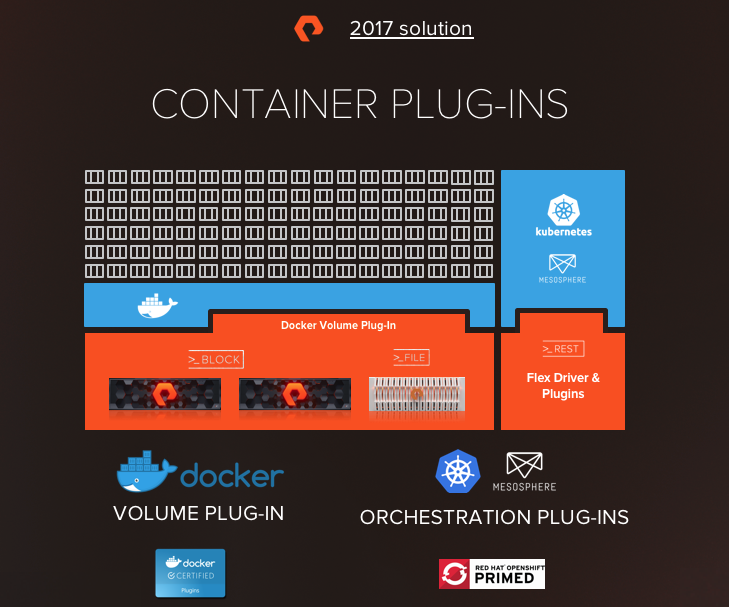
At Pure we have been working hard to develop a way to provide a persistent data layer that is able to meet the expectations of our customers for ease of use and simplicity. The first iteration of this was the release as the Docker and Kubernetes Plugins.
The plugins provided automated storage provisioning. Which solved a portion of the problem. All the while, we were working on the service that resided within those plugins. A service that would allow us to bring together managing many arrays. Both block and file.
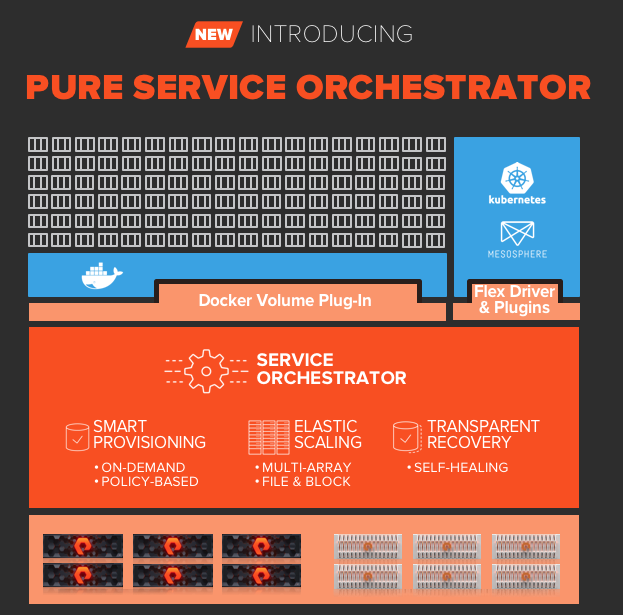
The new Pure Service Orchestrator will allow smart provisioning over many arrays. On-demand persistent storage for developers placed on the best array or adhering to your policies based on labels.
The second way that may fit into your own software deployment strategy is using Helm. Since using Helm provides a very quick and simple way to install and it may be new to you the rest of this post will be how to get started with PSO using Helm.
Installing Helm
Please be sure to install Helm using the correct RBAC intructions.
You can run a dry run of the installation if you want to see the output but not change anything on your cluster. It is important to remember the path to the yaml file you created above.
Since we do not want to assume you only have Pure Storage in you environment we do not force ‘pure’ as the default StorageClass in Kubernetes.
If you already installed the plugin via helm and need to set the default class to pure run this command.
kubectl patch storageclass pure -p '{"metadata": {"annotations":{"storageclass.kubernetes.io/is-default-class":"true"}}}'
If you have another storage class set to default and you wish to change it to Pure you must first remove the default tag from the other StorageClass and then run the command above. Having two defaults will produce undesired results. To remove the default tag run this command.
Maybe you are a visual learner check out these two demos showing the Helm installation in action.
Updating your Array information
If you need to add a new FlashArray or FlashBlade simply add the information to your YAML file and update via Helm. You may edit the config map within Kubernetes and there are good reasons to do it that way, but for simplicity we will stick to using helm for changes to the array info YAML file. Once your file contains the new array or label run the following command.
In the last couple of days I had a couple of questions from customers implementing some kind of container host on top of vSphere. Each was doing it to make use of either Kubernetes or Docker Volume Plugin for Pure Storage. First, there was a little confusion if the actual container needs to have iSCSI access to the array. The container needs network access for sure (I mean if you want somone to use the app) but it does not need access to the iSCSI network. Side Note: iSCSI is not required to use the persistent storage plugins for Pure. Fiber channel is supported. ISCSI may just be an easy path to using a PureFlash Array or NFS (10G network) for FlashBlade with an existing vSphere Setup.
To summarize all that: The container host VM needs access to talk directly to the storage. I accomplish this today with multiple vnics but you can do it however you like. There may be some vSwitches, physical nics and switches in the way, but the end result should be the VM talking to the FlashArray or FlashBlade.
More information on configuring our plugins is here:
Basically the container host needs to be able to talk to the MGMT interface of the array, to do it’s automation of creating host objects, volumes and connecting them together (also removing them when you are finished). The thing is to know the plugin does all the work for you. Then when your application manifest requests the storage the plugin mounts the device to the required mount point inside the container. The app (container) does not know or care anything about iSCSI, NFS or Fiber Channel (and it should not).
Container HOST Storage Networking
Container hosts as VM’s Storage Networking
If you are setting up iSCSI in vSphere for Pure, you should probably go see Cody’s pages on doing this most of this is a good idea as a foundation for what I am about to share.
So what I normally do is setup 2 new port groups on my VDS.
something like… iscsi-1 and iscsi-2 I know I am very original and creative.
Set the uplink for the Portgroup
We used to setup “in guest iSCSI” for VM’s that needed array based snaphost features way back in the day. This is basically the same piping. After creating the new port groups edit the settings in the HTML5 GUI as shown below.
Set the Failover Order
Go for iSCSI-1 on Uplink 1 and iSCSI-2 on Uplink 2
I favor putting the other Uplink into “Unused” as this gives me the straightest troubleshooting path in case something downstream isn’t working. You can put it in “standby” and probably be just fine.
That one time you all of sudden could not SSH into your Docker Swarm hosts?
I am writing this so I will remember to be smarter next time.
Ever Get this?
minas-tirith:~ jowings$ ssh scarif
@@@@@@@@@@@@@@@@@@@@@@@@@@@@@@@@@@@@@@@@@@@@@@@@@@@@@@@@@@@
@ WARNING: REMOTE HOST IDENTIFICATION HAS CHANGED! @
@@@@@@@@@@@@@@@@@@@@@@@@@@@@@@@@@@@@@@@@@@@@@@@@@@@@@@@@@@@
IT IS POSSIBLE THAT SOMEONE IS DOING SOMETHING NASTY!
I started to flip out and wondered why this just all of sudden happened on all four host in my swarm cluster. Was something actually nasty happening? Probably not, but you never know. I thought I broke the pub key on my mac. because I went into .ssh/known_hosts and removed the entry for my hosts as I quite commonly see this because I rebuild vm’s and hosts all the time. Then I got something different and got the same exact error from my Windows 10 machine.
Permission denied (publickey).
Pretty sure I didn’t break 2 different ssh clients on 2 different computers.
What did I do?
$docker stack deploy -c gitlab.yml gitlab
So I am keeping local git copies and thoughs I would be smart to have Gitlab to run this service in my home lab.
Problem in my zeal to have git use stander ssh tcp port 22 to push my repos up to the server I did this:
So basically my gitlab service was now available using tcp/22 on my entire cluster. Even though the container is only on one host they way Docker overlay networking works is any host in that cluster will forward the request for tcp/22 to that container. The container without my public key, the container that no matter my hostname does not have the same SSH “ID” as my actual hosts.
Bad move JO.
So don’t do that and stuff.
While I was writing this post the awesome Simon Dodsley was writing a great whitepaper on Persistent storage with Pure. As you can see there is some very different ways to deploy CockroachDB but the main goal is to keep your important data persistent no matter what happens to the containers as the scale, live and die.
I know most everyone loved seeing the demo of the most mission critical app in my house. I also want to show a few quick ways to leverage the Pure plugin to provide persistent data to a database. I am posting my files I used to create the demo here https://github.com/2vcps/crdb-demo-pure
First note
I started with the instructions provided here by Cockroach Labs.
This is an insecure installation for demo purposes. They do provide the instructions for a more Prod ready version. This is good enough for now.
My yaml file refers to a docker image I built for the HAproxy loadbalancer. If it works for you cool! If not please follow the instructions above to create your own. If you really need to know more I can write another post showing how to take the Dockerfile and copy the CFG generated by CRDB into a new image just for you.
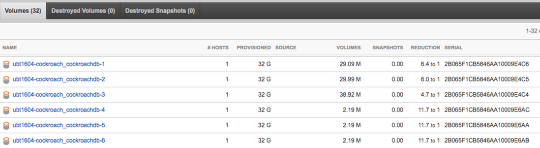
Like it shows in the compose file This command deploys 4 services. 3 database nodes and 1 HAproxy. Each database node gets a brand new volume attached directly to the path by the Pure Docker Volume Plugin.
New Volumes
Each new volume created and attached to the host via iSCSI and mounted into the container.
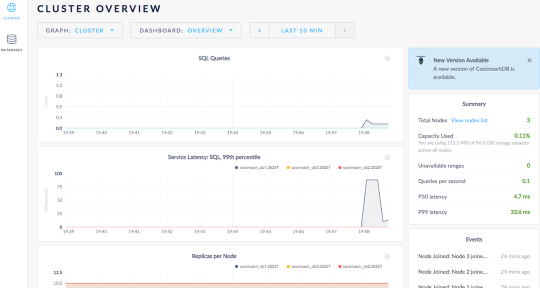
Cool Dashboard
Other than being no data do you notice something else?
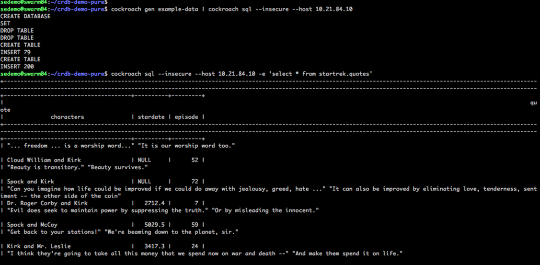
First lets generate some data.
I run this from a client machine but you can attach to one of the DB containers and run this command to generate some sample data.
cockroach gen example-data | cockroach sql --insecure --host [any host ip of your docker swam]
I am also going to create a “bank” database and use a few containers to start inserting data over and over.
cockroach sql --insecure --host 10.21.84.7
# Welcome to the cockroach SQL interface.
# All statements must be terminated by a semicolon.
# To exit: CTRL + D.
root@10.21.84.7:26257/> CREATE database bank;
CREATE DATABASE
root@10.21.84.7:26257/> set database = bank;
SET
root@10.21.84.7:26257/bank> create table accounts (
-> id INT PRIMARY KEY,
-> balance DECIMAL
-> );
CREATE TABLE
root@10.21.84.7:26257/bank> ^D
I created a program in golang to insert some data into the database just to make the charts interesting. This container starts, inserts a few thousand rows then exits. I run it as a service with 12 replicas so it is constantly going, I call it gogogo because I am funny.
gogogo
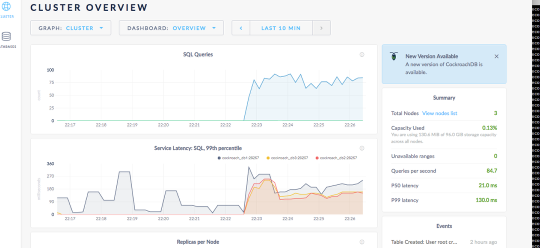
You can see the data slowly going into the volumes.
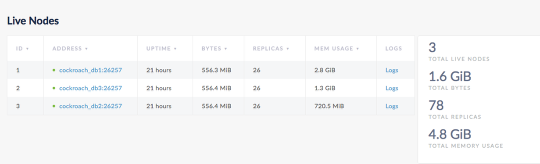
Each node remains balanced (roughly) as cockroachdb stores that data.
What happens if a container dies?
Lets make this one go away.
We kill it.
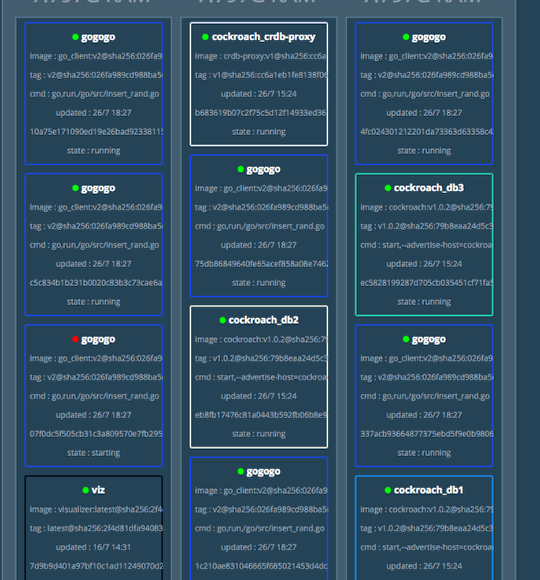
Swarm starts a new one. The Docker engine uses the Pure plugin and remounts the volume. The CRDB cluster keeps on going.
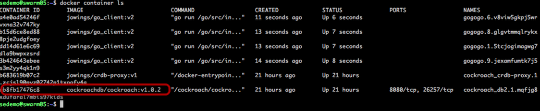
New container ID but the data is the same.
Alright what do I do now?
So you want to update the image to the latest version of Cockroach? Did you notice this in our first screenshot?
Also our database is getting a lot of hits, (not really but lets pretend), so we need to scale it out. What do we do now?
(important to provide the name of the stack you already used, or else errors)
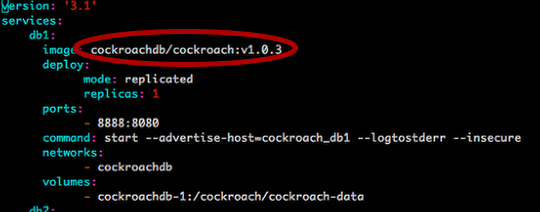
We are going to update the services with the new images.
This will replace the container with the new version — v1.0.3
This will attach the existing volumes for nodes db1,db2,db3 to the already created FlashArray volumes.
Also create new empty volumes for the new scaled out nodes db4,db5,db6
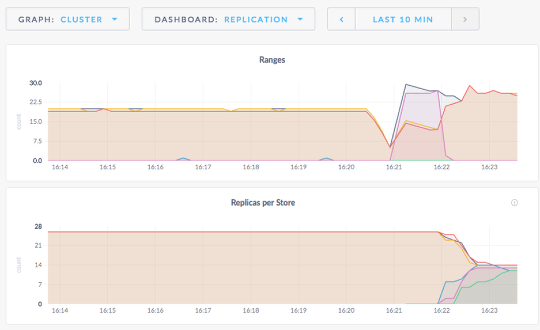
CockroachDB will begin replicating the data to the new nodes.
My gogogo client “barage” is still running
This is kind of the shotgun approach in this non-prod demo environment. If you want no downtime upgrades to containers I suggest reading more on blue-green deployments. I will show how to make the application upgrade with no downtime and use blue-green in another post.
Cockroach DB begins to reblance the data.
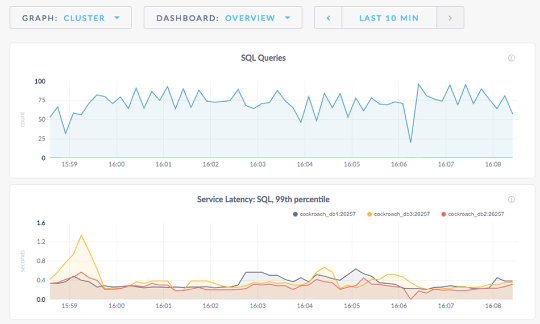
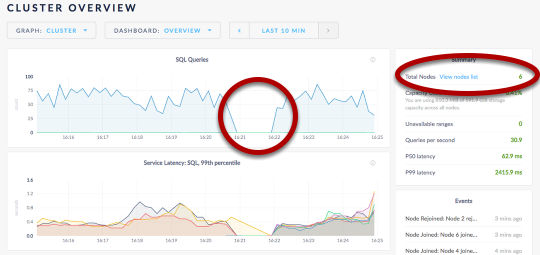
6 nodes
If you notice the gap in the queries it is becuase I updated every node all at once. A better way would be to do one at a time and make sure each node is back up while they “roll” through the upgrade to the new image. Not prod remember?
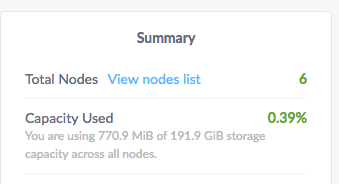
Application says you are using 771MiB of your 192GB. While the FlashArray is using just maybe 105MB across these volumes.
A little while later…
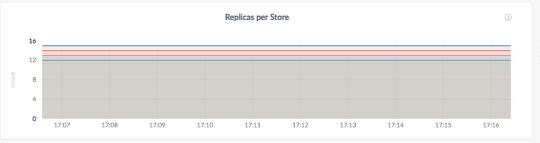
Now we are mostly balanced with replicas in each db node.
Conclusion
This is just scratching the surface and running highly scalable data applications in containers with persistent data on a FlashArray. Are you a Pure customer or potential Pure customer about to run stateful/persistent apps on Docker/Kubernetes/DCOS? I want to hear from you. Leave a comment or send me a message on Twitter @jon_2vcps.
If you are a developer and have no clue what your infrastructure team does or is doing I am here to help make everyone’s life better. No more weekend long deployments or upgrades. Get out of doing storage performance troubleshooting.
Remember the prerequisites. Check the official README for the latest information. Official README
Platform and Software Dependencies
Operating Systems Supported:
CentOS Linux 7.3
CoreOS (Ladybug 1298.6.0 and above)
Ubuntu (Trusty 14.04 LTS, Xenial 16.04.2 LTS)
Environments Supported :
Docker (v1.13 and above)
Swarm
Mesos 1.8 and above
Other software dependencies:
Latest iscsi initiator software for your operating system
Latest linux multipath software package for your operating system
Review: To install the plugin –
docker plugin install store/purestorage/docker-plugin:1.0 --alias pure
OR if you are annoyed by having to hit Y for the permissions the plugin requests.
docker plugin install store/purestorage/docker-plugin:1.0 --alias pure --grant-all-permissions
The installation process is the same as a standalone docker host except you must specify your clusterid. This is a unique string you assign to your swarm nodes.
docker plugin disable pure

docker plugin set pure PURE_DOCKER_NAMESPACE=<clusterid>

docker plugin enable pure
When you first install the Pure Volume Plugin the plugin is enabled. Docker will not allow you to modify the namespace while the plugin is in use. So we need to disable the plugin before making changes. This also means it is best to do this before creating and using any volumes.
Remember to put your API token and array management IP in the pure.json file under /etc/pure-docker-plugin/ – for each host.
More information Here
Demo for setting up Swarm and testing container failover
Experimenting with Kubernetes to orchestrate and manage containers? If you are like me and already have a lot invested in vSphere (time, infra, knowledge) you might be exctied to use Kubernetes Anywhere to deploy it quickly. I won’t re-write the instruction found here:
The vSphere option uses the Photon OS ova to spin up the container hosts and managers. So you can try it out easily with very little background in containers. That is dangerous as you will find yourself neck deep in new things to learn.
Don’t turn on the template!
If you are like me and *skim* instructions you could be in for hours of “Why do all my nodes have the same IP?” When you power on the Photon OS template the startup sequence generates a machine ID (and mac address). So even though I powered it back off, the cloning processes was producing identical VM’s for my kubernetes cluster. Those not hip to networking this is bad for communication.
Also, don’t try to be a good VMware Admin cad convert that VM to a VM Template. The Kubernetes Anywhere script won’t find it.
IF you do like me and skip a few lines reading (happens right) make sure to check this documenation out on Photon OS. It will help get you on the right track.
I had an issue with the Docker Swarm subnet automatically generated when I do:
$docker swarm init
Basically it was choosing the subnet my VPN connection was using to assign an IP to my machine on the internal network. Obviously this wreaked havoc on me being able to connect to the docker hosts I was working with in our lab.
I decided it would be worth it to create the docker_gwbridge network and assign the CIDR subnet for the network that would not overlap with the VPN.
I did this before I created the swarm cluster. So far everything is working fine in the lab and I am able to SSH to the Docker Host and connect to the services I am testing on those machines. There may be other issues and I will report back as I find them.
[UPDATE June 2016: Appears this works with Ubuntu only, maybe a debian flavor. I am hearing RHEL is problematic to get the dependencies working.]
I have blogged in the past about setting up vROPS (vCOPS) and Splunk to monitor a Pure Storage FlashArray using the REST API. Scripts and GETs and PUTs are fun and all but what if there was a simple tool you can install to have your own on site monitoring and analytics of your FlashArrays?
Enter Pure ELK. Some super awesome engineers back in Mountain View wrote this integration for Pure and ELK and packaged it an amazingly easy insatllation and released it on Github! Open Source and ready to go! https://github.com/pureelk
Don’t know Docker? Cool we will install it for you. Don’t know Kibana or elasticsearch? Got you covered. One line in a fresh Ubuntu install (I used Ubuntu but I bet your favorite flavor will suffice).
This will download and install docker, setup all the dependencies for Pure ELK and let you know where to go from your browser to config your FlashArrays.
I had one small snag:
Connecting to the Docker Daemon!
My user was not in the right group to connect to docker the first time. The Docker install when it is not automated actually tells you to add your user to the “docker” group in order to
$sudo usermod -aG docker [username]
Log out and back in that did the trick. If you know a better way for the change to be recognized without logging out let me know in the comments.
I re-ran the install curl -s https://raw.githubusercontent.com/pureelk/pureelk/dev/pureelk.sh | bash -s install
In about 4 minutes I was able to hit the management IP and start adding FlashArrays!
Quickly add all your FlashArrays
Click the giant orange PLUS button.
This is great if you have more than one FlashArray. If you only have one it still works. Everyone should have more Flash though right?
Fill in your FlashArray information. You can choose your time-to-live for the metrics and how often to pull data from the FlashArray
Success!
I added a couple of arrays for fun and then clicked “Go to Kibana”
I could have gone to
https://[server ip]:5601
Data Already Collecting
This is just the beginning. The next post I will share some of the pre-packaged dashboards and also some of the cusotmizations you can make in order to visualize all the Data PureELK is pulling from the REST API. Have fun with this free tool. It can be downloaded and setup in less than 10 minutes on a linux machine, 15 minutes if you need to build a new VM.