Be Awesome with Neo4j Graph Database In Kubernetes

Graph DB solution Neo4j is popular with Data Scientists and Data Architects trying to make connections of the nodes and relationships. Neo4j is able to do memory management other in memory operations to allow for efficiency and performance. All of that data needs to eventual persist to a data management platform. This is why I was first asked about Neo4j.

Some cool nodes

There are Community and Enterprise Editions like most software solutions these days and the robust enterprise type functions land in the Enterprise Edition. Things like RBAC and much higher scale.

Neo4j provides a repo of Helm charts and some helpful documentation on running the Graph Database in Kubernetes. Unfortunately, the instructions stop short of many of the K8s flavors supported by the cloud and on premises solutions. Pre-provisioning cloud disks might be great for a point solution of a single app. Most of my interactions with the people running k8s in production are building Platform as a Service (PaaS) or Database as a Service (DBaaS). Nearly all at least want the option of building these solutions to be hybrid or multi cloud capable. Additionally, DR and Backup are requirements to run in any environment that values their data and staying in business.

Portworx in 20 seconds

Portworx is a data platform that allows stateful applications such as Neo4j to run on an Cloud, on Premises Hardware on any K8s Distribution. It was built from the very beginning to run as a container for containers. </end commercial>

In this blog post I want to enhance and clarify the documentation for the Neo4j helm chart so that you can easily run the community or Enterprise Editions in your K8s deployment.

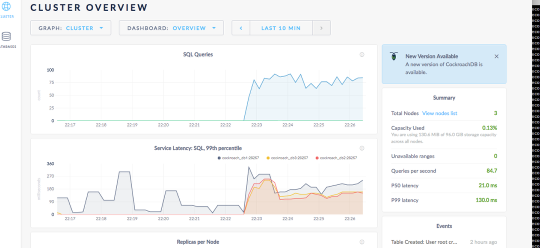
As with any database Neo4j will benefit greatly from running the persistence on Flash. All of my testing was done with a Pure Storage FlashArray.

Step 1

Already have K8s and Portworx installed. I used Portworx 2.9.1.1 and Vanilla K8s 1.22. Also already have Helm installed.
Note: The helm chart was giving me trouble until I updated helm to version 3.8.x

Step 2

Add the Neo4j helm repo

helm repo add neo4j https://helm.neo4j.com/neo4j
helm repo update

Step 3

Create a neo4j storage class

kind: StorageClass
apiVersion: storage.k8s.io/v1
metadata:
  name: neo4j
provisioner: pxd.portworx.com
parameters:
  repl: "2"
  io_profile: db_remote
kubectl apply -f neo4j-storageclass.yaml

Verify the Storage Class is available

kubectl get sc

Step 4

Create your values.yaml for your install.

values-standalone.yaml
neo4j:
  resources:
    cpu: "0.5"
    memory: "2Gi"

  # Uncomment to set the initial password
  #password: "my-initial-password"

  # Uncomment to use enterprise edition
  #edition: "enterprise"
  #acceptLicenseAgreement: "yes"

volumes:
  data:
    mode: "dynamic"
    # Only used if mode is set to "dynamic"
    # Dynamic provisioning using the provided storageClass
    dynamic:
      storageClassName: "neo4j"
      accessModes:
        - ReadWriteOnce
      requests:
        storage: 100Gi

Cluster values.yaml

node[0-x]values-cluster.yaml

Why do I say 0-x? Well neo4j requires a helm release for each core cluster node (read more detail in the neo4j helm docs). Each file for now is the same. Note: neo4j is an in memory database. 2Gi ram is great for the lab, but for really analytics use I would hope to use much more memory.

neo4j:
  name: "my-cluster"
  resources:
    cpu: "0.5"
    memory: "2Gi"
  password: "my-password"
  acceptLicenseAgreement: "yes"

volumes:
  data:
    mode: "dynamic"
    # Only used if mode is set to "dynamic"
    # Dynamic provisioning using the provided storageClass
    dynamic:
      storageClassName: "neo4j"
      accessModes:
        - ReadWriteOnce
      requests:
        storage: 100Gi
Read Replica values

Create another helm yaml file here is rr1-values-cluster.yaml

neo4j:
  name: "my-cluster"
  resources:
    cpu: "0.5"
    memory: "2Gi"
  password: "my-password"
  acceptLicenseAgreement: "yes"

volumes:
  data:
    mode: "dynamic"
    # Only used if mode is set to "dynamic"
    # Dynamic provisioning using the provided storageClass
    dynamic:
      storageClassName: "neo4j"
      accessModes:
        - ReadWriteOnce
      requests:
        storage: 100Gi

Download all the values.yaml from GitHub

Step 5

Install Neo4j (stand alone)

Standalone

The docs say to run this:

helm install my-neo4j-release neo4j/neo4j-standalone -f my-neo4j.values-standalone.yaml

I do the following and I’ll explain why.

helm install -n neo4j-1 neo4j-1 neo4j/neo4j-standalone -f ./values-standalone.yaml --create-namespace

Cluster Install

For each cluster node values.yaml

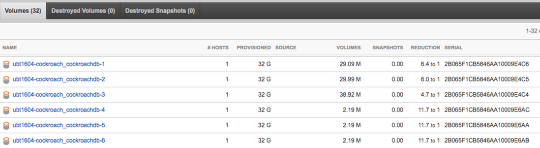
helm install -n neo4j-cluster neo4j-cluster-3 neo4j/neo4j-cluster-core -f ./node1-values-cluster.yaml --create-namespace

You need a minimum of 3 core nodes to create a cluster. So you must run the helm install command 3 times for the neo4j-cluster-core helm chart.

Successful Cluster Creation
 kubectl -n neo4j-cluster exec neo4j-cluster-0 -- tail /logs/neo4j.log
2022-03-29 19:14:55.139+0000 INFO  Bolt enabled on [0:0:0:0:0:0:0:0%0]:7687.
2022-03-29 19:14:55.141+0000 INFO  Bolt (Routing) enabled on [0:0:0:0:0:0:0:0%0]:7688.
2022-03-29 19:15:09.324+0000 INFO  Remote interface available at http://localhost:7474/
2022-03-29 19:15:09.337+0000 INFO  id: E2E827273BD3E291C8DF4D4162323C77935396BB4FFB14A278EAA08A989EB0D2
2022-03-29 19:15:09.337+0000 INFO  name: system
2022-03-29 19:15:09.337+0000 INFO  creationDate: 2022-03-29T19:13:44.464Z
2022-03-29 19:15:09.337+0000 INFO  Started.
2022-03-29 19:15:35.595+0000 INFO  Connected to neo4j-cluster-3-internals.neo4j-cluster.svc.cluster.local/10.233.125.2:7000 [RAFT version:5.0]
2022-03-29 19:15:35.739+0000 INFO  Connected to neo4j-cluster-2-internals.neo4j-cluster.svc.cluster.local/10.233.127.2:7000 [RAFT version:5.0]
2022-03-29 19:15:35.876+0000 INFO  Connected to neo4j-cluster-3-internals.neo4j-cluster.svc.cluster.local/10.233.125.2:7000 [RAFT version:5.0]
Install Read Replica

The cluster must be up and functioning to install the read replica.

helm install -n neo4j-cluster neo4j-cluster-rr1 neo4j/neo4j-cluster-read-replica -f ./rr1-values-cluster.yaml
Install the Loadbalancer

To access neo4j from an external source you should install the loadbalancer service. Run the following command in our example.

 helm install -n neo4j-cluster lb neo4j/neo4j-cluster-loadbalancer --set neo4j.name=my-cluster
Why the -n tag?

I provide the -n with a namespace and the –create-namespace tag because it allows me to install my helm release in this case neo4j-1 into its own namespace. Which helps with operations for DR, Backup and even lifecycle cleanup down the road. When installing a cluster all the helm releases must be in the same namesapce.

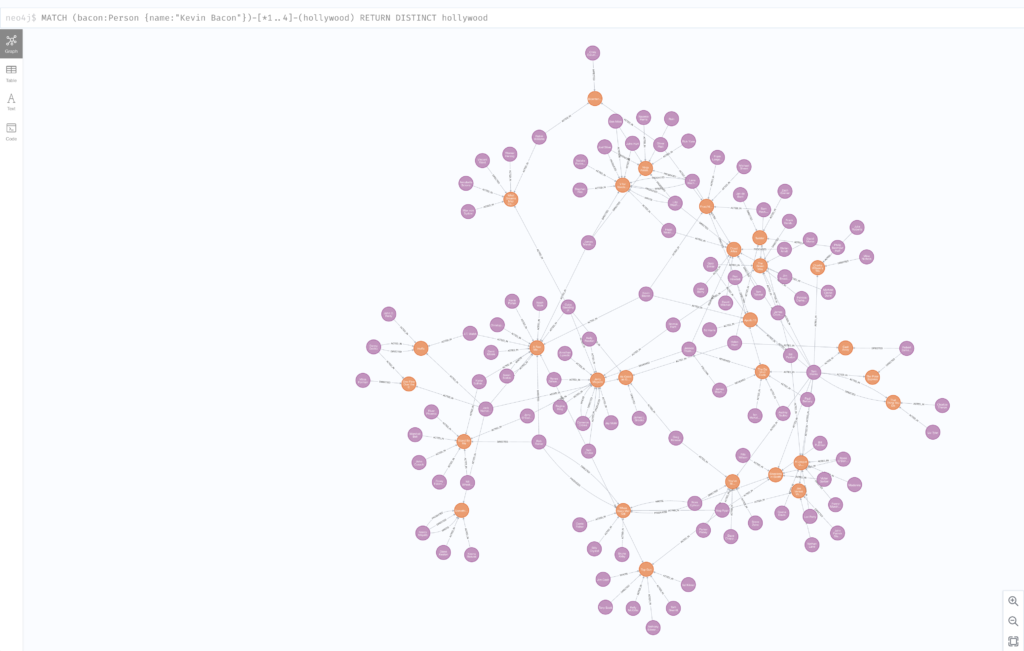
Start Graph Databasing!

As you can see there are plenty of tutorials to see how you may use Neo4j

Some other tips:
https://neo4j.com/docs/operations-manual/current/performance/disks-ram-and-other-tips/

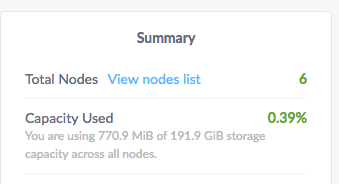
See below for detials of the PX Cluster

Status: PX is operational
Telemetry: Disabled or Unhealthy
License: Trial (expires in 31 days)
Node ID: ade858a2-30d4-41ba-a2ce-7ee1f9b7c4c0
	IP: 10.21.244.207
 	Local Storage Pool: 1 pool
	POOL	IO_PRIORITY	RAID_LEVEL	USABLE	USED	STATUS	ZONE	REGION
	0	HIGH		raid0		297 GiB	12 GiB	Online	default	default
	Local Storage Devices: 2 devices
	Device	Path							Media Type		Size		Last-Scan
	0:1	/dev/mapper/3624a937081f096d1c1642a6900d954aa-part2	STORAGE_MEDIUM_SSD	147 GiB		29 Mar 22 16:21 UTC
	0:2	/dev/mapper/3624a937081f096d1c1642a6900d954ab		STORAGE_MEDIUM_SSD	150 GiB		29 Mar 22 16:21 UTC
	total								-			297 GiB
	Cache Devices:
	 * No cache devices
	Journal Device:
	1	/dev/mapper/3624a937081f096d1c1642a6900d954aa-part1	STORAGE_MEDIUM_SSD
Cluster Summary
	Cluster ID: px-fa-demo1
	Cluster UUID: 76eaa789-384d-4af2-b476-b9b3fd7fdcab
	Scheduler: kubernetes
	Nodes: 8 node(s) with storage (8 online)
	IP		ID					SchedulerNodeName	Auth		StorageNode	Used	Capacity	Status	StorageStatus	Version		Kernel			OS
	10.21.244.203	f917d321-3857-4ee1-bfaf-df6419fdac53	pxfa1-3			Disabled	Yes		12 GiB	297 GiB		Online	Up	2.9.1.3-7769924	5.4.0-105-generic	Ubuntu 20.04.4 LTS
	10.21.244.209	c3bea2dc-10cd-4485-8d02-e65a23bf10aa	pxfa1-9			Disabled	Yes		12 GiB	297 GiB		Online	Up	2.9.1.3-7769924	5.4.0-105-generic	Ubuntu 20.04.4 LTS
	10.21.244.204	b27e351a-fed3-40b9-a6d3-7de2e7e88ac3	pxfa1-4			Disabled	Yes		12 GiB	297 GiB		Online	Up	2.9.1.3-7769924	5.4.0-105-generic	Ubuntu 20.04.4 LTS
	10.21.244.207	ade858a2-30d4-41ba-a2ce-7ee1f9b7c4c0	pxfa1-7			Disabled	Yes		12 GiB	297 GiB		Online	Up (This node)	2.9.1.3-7769924	5.4.0-105-generic	Ubuntu 20.04.4 LTS
	10.21.244.205	a413f877-3199-4664-961a-0296faa3589d	pxfa1-5			Disabled	Yes		12 GiB	297 GiB		Online	Up	2.9.1.3-7769924	5.4.0-105-generic	Ubuntu 20.04.4 LTS
	10.21.244.202	37ae23c7-1205-4a03-bbe1-a16a7e58849a	pxfa1-2			Disabled	Yes		12 GiB	297 GiB		Online	Up	2.9.1.3-7769924	5.4.0-105-generic	Ubuntu 20.04.4 LTS
	10.21.244.206	369bfc54-9f75-45ef-9442-b6494c7f0572	pxfa1-6			Disabled	Yes		12 GiB	297 GiB		Online	Up	2.9.1.3-7769924	5.4.0-105-generic	Ubuntu 20.04.4 LTS
	10.21.244.208	00683edb-96fc-4861-815d-a0430f8fc84b	pxfa1-8			Disabled	Yes		12 GiB	297 GiB		Online	Up	2.9.1.3-7769924	5.4.0-105-generic	Ubuntu 20.04.4 LTS
Global Storage Pool
	Total Used    	:  96 GiB
	Total Capacity	:  2.3 TiB

CockroachDB with Persistent Data

There IS an Official Whitepaper!

While I was writing this post the awesome Simon Dodsley was writing a great whitepaper on Persistent storage with Pure. As you can see there is some very different ways to deploy CockroachDB but the main goal is to keep your important data persistent no matter what happens to the containers as the scale, live and die.

I know most everyone loved seeing the demo of the most mission critical app in my house. I also want to show a few quick ways to leverage the Pure plugin to provide persistent data to a database. I am posting my files I used to create the demo here https://github.com/2vcps/crdb-demo-pure

First note
I started with the instructions provided here by Cockroach Labs.
This is an insecure installation for demo purposes. They do provide the instructions for a more Prod ready version. This is good enough for now.

Second note
The loadbalancer I used was created for my environment using the intructions to output the HAProxy file found here on the Cockroach Labs website:
https://www.cockroachlabs.com/docs/stable/generate-cockroachdb-resources.html

My yaml file refers to a docker image I built for the HAproxy loadbalancer. If it works for you cool! If not please follow the instructions above to create your own. If you really need to know more I can write another post showing how to take the Dockerfile and copy the CFG generated by CRDB into a new image just for you.


My nice little docker swarm

media_1501095950777.png

I have three VMware VM’s running Ubuntu 16.04. With Docker CE and the Pure plugin already installed. Read more here if you want to install the plugin.

media_1501096079095.png

Run the deploy

https://github.com/2vcps/crdb-demo-pure/blob/master/3node-cockroachdb-pure.yml

version: '3.1'
services:
    db1:
      image: cockroachdb/cockroach:v1.0.2
      deploy:
            mode: replicated
            replicas: 1
      ports:
            - 8888:8080
      command: start --advertise-host=cockroach_db1 --logtostderr --insecure
      networks:
            - cockroachdb
      volumes:
            - cockroachdb-1:/cockroach/cockroach-data
    db2:
      image: cockroachdb/cockroach:v1.0.2
      deploy:
         mode: replicated
         replicas: 1
      command: start --advertise-host=cockroach_db2 --join=cockroach_db1:26257 --logtostderr --insecure
      networks:
         - cockroachdb
      volumes:
         - cockroachdb-2:/cockroach/cockroach-data
    db3:
      image: cockroachdb/cockroach:v1.0.2
      deploy:
         mode: replicated
         replicas: 1
      command: start --advertise-host=cockroach_db3 --join=cockroach_db1:26257 --logtostderr --insecure
      networks:
         - cockroachdb
      volumes:
         - cockroachdb-3:/cockroach/cockroach-data
    crdb-proxy:
      image: jowings/crdb-proxy:v1
      deploy:
         mode: replicated
         replicas: 1
      ports:
         - 26257:26257
      networks: 
         - cockroachdb

networks:
    cockroachdb:
        external: true

volumes:
    cockroachdb-1:
      driver: pure
    cockroachdb-2:
      driver: pure
    cockroachdb-3:
      driver: pure


#docker stack deploy -c 3node-cockroachdb-pure.yml cockroach

Like it shows in the compose file This command deploys 4 services. 3 database nodes and 1 HAproxy. Each database node gets a brand new volume attached directly to the path by the Pure Docker Volume Plugin.

New Volumes

media_1501098437804.png

Each new volume created and attached to the host via iSCSI and mounted into the container.

Cool Dashboard

media_1501098544719.png

Other than being no data do you notice something else?
First lets generate some data.
I run this from a client machine but you can attach to one of the DB containers and run this command to generate some sample data.

cockroach gen example-data | cockroach sql --insecure --host [any host ip of your docker swam]

media_1501098910914.png

I am also going to create a “bank” database and use a few containers to start inserting data over and over.

cockroach sql --insecure --host 10.21.84.7
# Welcome to the cockroach SQL interface.
# All statements must be terminated by a semicolon.
# To exit: CTRL + D.
root@10.21.84.7:26257/> CREATE database bank;
CREATE DATABASE
root@10.21.84.7:26257/> set database = bank;
SET
root@10.21.84.7:26257/bank> create table accounts (
-> id INT PRIMARY KEY,
-> balance DECIMAL
-> );
CREATE TABLE
root@10.21.84.7:26257/bank> ^D

I created a program in golang to insert some data into the database just to make the charts interesting. This container starts, inserts a few thousand rows then exits. I run it as a service with 12 replicas so it is constantly going, I call it gogogo because I am funny.

media_1501108005294.png

gogogo

media_1501108062456.png
media_1501108412285.png

You can see the data slowly going into the volumes.

media_1501171172944.png

Each node remains balanced (roughly) as cockroachdb stores that data.

What happens if a container dies?

media_1501171487843.png

Lets make this one go away.

media_1501171632191.png

We kill it.
Swarm starts a new one. The Docker engine uses the Pure plugin and remounts the volume. The CRDB cluster keeps on going.
New container ID but the data is the same.

media_1501171737281.png

Alright what do I do now?

media_1501171851533.png

So you want to update the image to the latest version of Cockroach? Did you notice this in our first screenshot?

Also our database is getting a lot of hits, (not really but lets pretend), so we need to scale it out. What do we do now?

https://github.com/2vcps/crdb-demo-pure/blob/master/6node-cockroachdb-pure.yml

version: '3.1'
services:
    db1:
      image: cockroachdb/cockroach:v1.0.3
      deploy:
            mode: replicated
            replicas: 1
      ports:
            - 8888:8080
      command: start --advertise-host=cockroach_db1 --logtostderr --insecure
      networks:
            - cockroachdb
      volumes:
            - cockroachdb-1:/cockroach/cockroach-data
    db2:
      image: cockroachdb/cockroach:v1.0.3
      deploy:
         mode: replicated
         replicas: 1
      command: start --advertise-host=cockroach_db2 --join=cockroach_db1:26257 --logtostderr --insecure
      networks:
         - cockroachdb
      volumes:
         - cockroachdb-2:/cockroach/cockroach-data
    db3:
      image: cockroachdb/cockroach:v1.0.3
      deploy:
         mode: replicated
         replicas: 1
      command: start --advertise-host=cockroach_db3 --join=cockroach_db1:26257 --logtostderr --insecure
      networks:
         - cockroachdb
      volumes:
         - cockroachdb-3:/cockroach/cockroach-data
    crdb-proxy:
      image: jowings/crdb-haproxy:v2
      deploy:
         mode: replicated
         replicas: 1
      ports:
         - 26257:26257
      networks: 
         - cockroachdb
    db4:
      image: cockroachdb/cockroach:v1.0.3
      deploy:
         mode: replicated
         replicas: 1
      command: start --advertise-host=cockroach_db4 --join=cockroach_db1:26257 --logtostderr --insecure
      networks:
         - cockroachdb
      volumes:
         - cockroachdb-4:/cockroach/cockroach-data
    db5:
      image: cockroachdb/cockroach:v1.0.3
      deploy:
         mode: replicated
         replicas: 1
      command: start --advertise-host=cockroach_db5 --join=cockroach_db1:26257 --logtostderr --insecure
      networks:
         - cockroachdb
      volumes:
         - cockroachdb-5:/cockroach/cockroach-data
    db6:
      image: cockroachdb/cockroach:v1.0.3
      deploy:
         mode: replicated
         replicas: 1
      command: start --advertise-host=cockroach_db6 --join=cockroach_db1:26257 --logtostderr --insecure
      networks:
         - cockroachdb
      volumes:
         - cockroachdb-6:/cockroach/cockroach-data
networks:
    cockroachdb:
        external: true

volumes:
    cockroachdb-1:
      driver: pure
    cockroachdb-2:
      driver: pure
    cockroachdb-3:
      driver: pure
    cockroachdb-4:
      driver: pure
    cockroachdb-5:
      driver: pure
    cockroachdb-6:
      driver: pure
$docker stack deploy -c 6node-cockroachdb-pure.yml cockroach

(important to provide the name of the stack you already used, or else errors)

media_1501172007803.png

We are going to update the services with the new images.

  1. This will replace the container with the new version — v1.0.3
  2. This will attach the existing volumes for nodes db1,db2,db3 to the already created FlashArray volumes.
  3. Also create new empty volumes for the new scaled out nodes db4,db5,db6
  4. CockroachDB will begin replicating the data to the new nodes.
  5. My gogogo client “barage” is still running

This is kind of the shotgun approach in this non-prod demo environment. If you want no downtime upgrades to containers I suggest reading more on blue-green deployments. I will show how to make the application upgrade with no downtime and use blue-green in another post.

Cockroach DB begins to reblance the data.

media_1501172638117.png

6 nodes

media_1501172712079.png

If you notice the gap in the queries it is becuase I updated every node all at once. A better way would be to do one at a time and make sure each node is back up while they “roll” through the upgrade to the new image. Not prod remember?

media_1501172781312.png
media_1501172828992.png

Application says you are using 771MiB of your 192GB. While the FlashArray is using just maybe 105MB across these volumes.

A little while later…

media_1501175811897.png

Now we are mostly balanced with replicas in each db node.

Conclusion
This is just scratching the surface and running highly scalable data applications in containers with persistent data on a FlashArray. Are you a Pure customer or potential Pure customer about to run stateful/persistent apps on Docker/Kubernetes/DCOS? I want to hear from you. Leave a comment or send me a message on Twitter @jon_2vcps.

If you are a developer and have no clue what your infrastructure team does or is doing I am here to help make everyone’s life better. No more weekend long deployments or upgrades. Get out of doing storage performance troubleshooting.

Go to more of your kids soccer games.