Why Pure Service Orchestrator?
At Pure we have been working hard to develop a way to provide a persistent data layer that is able to meet the expectations of our customers for ease of use and simplicity. The first iteration of this was the release as the Docker and Kubernetes Plugins.
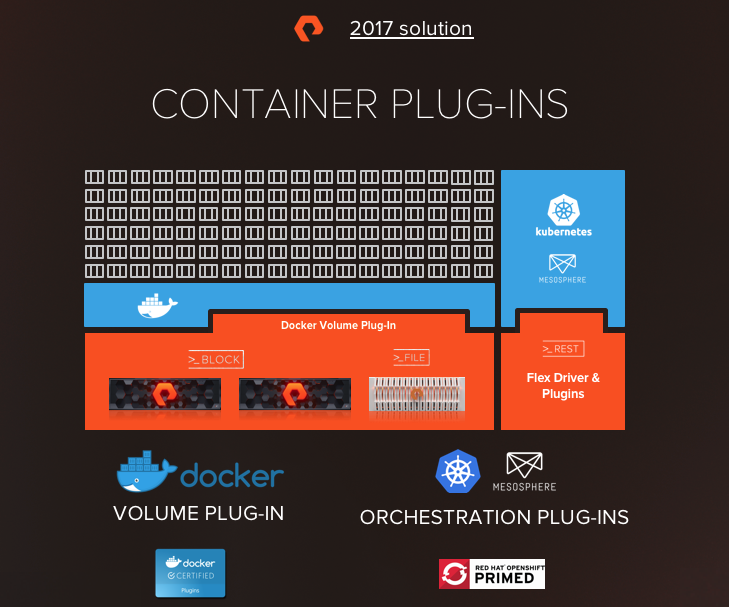
The plugins provided automated storage provisioning. Which solved a portion of the problem. All the while, we were working on the service that resided within those plugins. A service that would allow us to bring together managing many arrays. Both block and file.
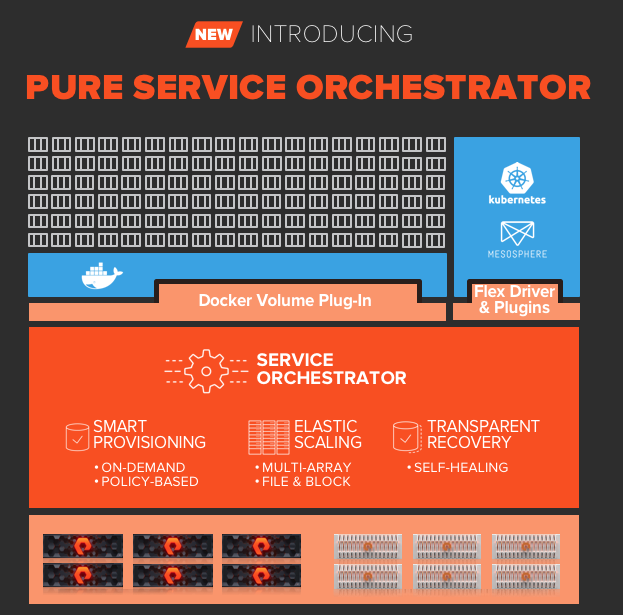
The new Pure Service Orchestrator will allow smart provisioning over many arrays. On-demand persistent storage for developers placed on the best array or adhering to your policies based on labels.
To install you can use the traditional shell script as described in the readme file here.
The second way that may fit into your own software deployment strategy is using Helm. Since using Helm provides a very quick and simple way to install and it may be new to you the rest of this post will be how to get started with PSO using Helm.
Installing Helm
Please be sure to install Helm using the correct RBAC intructions.
I describe the process in my blog here.
http://54.88.246.86/2018/03/27/getting-started-with-helm-for-k8s/
Also, get acquainted with the official Helm documentation at the following site:
https://docs.helm.sh/using_helm/
Once Helm is fully functioning with your Kubernetes cluster run the following commands to setup and Pure Storage Helm repo:
helm repo add pure https://purestorage.github.io/helm-charts
helm repo update
helm search pure-k8s-plugin
Additionally, you need to create a YAML file with the following formate and contents:
arrays:
  FlashArrays:
    - MgmtEndPoint: "1.2.3.4"
      APIToken: "a526a4c6-18b0-a8c9-1afa-3499293574bb"
      Labels:
        rack: "22"
        env: "prod"
    - MgmtEndPoint: "1.2.3.5"
      APIToken: "b526a4c6-18b0-a8c9-1afa-3499293574bb"
  FlashBlades:
    - MgmtEndPoint: "1.2.3.6"
      APIToken: "T-c4925090-c9bf-4033-8537-d24ee5669135"
      NFSEndPoint: "1.2.3.7"
      Labels:
        rack: "7b"
        env: "dev"
    - MgmtEndPoint: "1.2.3.8"
      APIToken: "T-d4925090-c9bf-4033-8537-d24ee5669135"
      NFSEndPoint: "1.2.3.9"
      Labels:
        rack: "6a"
You can run a dry run of the installation if you want to see the output but not change anything on your cluster. It is important to remember the path to the yaml file you created above.
helm install --name pure-storage-driver pure/pure-k8s-plugin -f <your_own_dir>/yourvalues.yaml --dry-run --debug
If you are satisfied with the output of the dry run you can run the install now.
helm install --name pure-storage-driver pure/pure-k8s-plugin -f <your_own_dir>/yourvalues.yaml
Please check the GitHub page hosting the Pure Storage repo for more detail.
https://github.com/purestorage/helm-charts/tree/master/pure-k8s-plugin#how-to-install
Setting the Default StorageClass
Since we do not want to assume you only have Pure Storage in you environment we do not force ‘pure’ as the default StorageClass in Kubernetes.
If you already installed the plugin via helm and need to set the default class to pure run this command.
kubectl patch storageclass pure -p '{"metadata": {"annotations":{"storageclass.kubernetes.io/is-default-class":"true"}}}'If you have another storage class set to default and you wish to change it to Pure you must first remove the default tag from the other StorageClass and then run the command above. Having two defaults will produce undesired results. To remove the default tag run this command.
kubectl patch storageclass <your-class-name> -p '{"metadata": {"annotations":{"storageclass.kubernetes.io/is-default-class":"false"}}}'Read more about these commands from the K8s documentation.
https://kubernetes.io/docs/tasks/administer-cluster/change-default-storage-class/
Demo
Maybe you are a visual learner check out these two demos showing the Helm installation in action.
Updating your Array information
If you need to add a new FlashArray or FlashBlade simply add the information to your YAML file and update via Helm. You may edit the config map within Kubernetes and there are good reasons to do it that way, but for simplicity we will stick to using helm for changes to the array info YAML file. Once your file contains the new array or label run the following command.
helm upgrade pure-storage-driver pure/pure-k8s-plugin -f <your_own_dir>/yourvalues.yaml --set ...
Upgrading using Helm
With the same general process you can use the following command and update the version of Pure Service Orchestrator.
helm upgrade pure-storage-driver pure/pure-k8s-plugin -f <your_own_dir>/yourvalues.yaml --version <target version>
Upgrading from the legacy plugin to the Helm version
Follow the instructions here:
There are a few platform specific considerations you should make if you are using any of the following.
- Containerized Kubelet (Some flavors of K8s do this, Rancher and Openshift are two).
- CentOS/RHEL Atomic Linux
- CoreOS
- OpenShift
- OpenShift Containerized Deployment
Be certain to read through the notes if you use any of these platform versions.