Demo! Zero Data loss App Recovery in Kubernetes aka Disaster Recovery

For the demo I have 2 Kubernetes clusters with a single stretched Portworx cluster in AWS. This allows Metro DR to mirror the data between the 2 clusters so if there is a complete loss of Cluster 1 the application can be restarted with no loss of data.

You can have active workloads on both clusters. Just FYI.

Lots of new things to learn over the last month. I wanted to present everyone with my first demo with #portworxbypure. The official documentation is here. Always read the docs on how to set it up.

For the demo I have 2 Kubernetes clusters with a single stretched Portworx cluster in AWS. This allows Metro DR to mirror the data between the 2 clusters so if there is a complete loss of Cluster 1 the application can be restarted with no loss of data. The ELB in Amazon can be set to provide little interaction when getting your app back up and working, for this demo I tell the the deployment to fail over. Sort of the big red button for failover. Like all the things Cloud Native this can be automated.

Please check out this demo on YouTube and let me know what you think.

There are of course many options when it comes to how your app will work and this is for a basic web frontend and database. Scale out databases can be treated different. It all depends on how your application is architected and what the DR requirements will be.

Ephemeral or Persistent? The Storage Choices for Containers (Part 2)

In this, the second part of a 3-part series, I cover persistent storage. Part 1 covered traditional ephemeral storage.

Persistent Storage

Persistent storage as the name implies is storage that can maintain the state of the data it holds over the failure and restart of an application, regardless of the worker node on which the application is running. It is also possible with persistent storage to keep the data used or created by an application after the application has been deleted. This is useful if you need to reutilize the data in another application, or as enable the application to restart in the future and still have the latest dataset available. You can also leverage persistent storage to allow for disaster recovery or business continuity copies of the dataset. 

StorageClass

A construct in Kubernetes that has to be understood for storage is the StorageClass. A StorageClass provides a way for administrators to describe the “classes” of storage they offer. Different classes might map to quality-of-service levels, or different access rules, or any arbitrary policies determined by the cluster administrators.

Each CSI storage driver will have a unique provisioner that is assigned as an attribute to a storage class and instructs any persistent volumes associated with that storage class to use the named provisioner, or CSI driver when provisioning the underlying volume on the storage platform.

Provisioning

Obtaining persistent storage for a pod is a three-step process:

  1. Define a PersistentVolume (PV), which is the disk space available for use
  2. Define a PersistentVolumeClaim (PVC), which claims usage of part or all of the PersistentVolume disk space
  3. Create a pod that references the PersistentVolumeClaim

In modern-day CSI drivers, the first two steps are usually combined into a single task and this is referred to as dynamic provisioning. Here the PersistentVolumeClaim is 100% if the PersistentVolume and the volume will be formatted with a filesystem on first attachment to a pod.

Manual provisioning can also be used with some CSI drivers to import existing volumes on storage devices into the control of Kubernetes by converting the existing volume into a PersistentVolume. In this case, the existing filesystem on the original volume is kept with all existing data when first mounted to the pod. An extension of this is the ability to import a snapshot of an existing volume, thereby creating a full read-write clone of the source volume the snapshot derived from.

When a PV is created it is assigned a storageClassName attribute and this class name controls many attributes of the PV as mentioned earlier. Note that the storageClassName attribute ensures the use of this volume to only the PVCs that request the equivalent StorageClass. In the case of dynamic provisioning, this is all managed automatically and the application only needs to call the required StorageClass the PVC wants storage from and the volume is created and then bound to a claim.

When the application is complete or is deleted, depending on the way the PV was initially created, the underlying volume construct can either be deleted or retained for use by another application, or a restart of the original application. This is controlled by the reclaimPolicy in the storageClass definition. In dynamic provisioning the normal setting for this is delete, meaning that when the PVC is deleted the associated PV is deleted and the underlying storage volume is also deleted. 

By setting the reclaimPolicy to retain this allows for manual reclamation of the PV.

On deletion of the PVC, the associated PV is not deleted and can be reused by another PVC with the same name as the original PVC. This is the only PVC that can access the PV and this concept is used a lot with StatefulSets.

It should be noted that when a PV is retained a subsequent deletion of the PV will result in the underlying storage volume NOT being deleted, so it is essential that a simple way to ensure orphaned volumes do not adversely affect your underlying storage platforms capacity.

At this point, I’d like to mention Pure Service Orchestrator eXplorer which is an Open Source project to provide a single plane of glass for storage and Kubernetes administrator to visualize how Pure Service Orchestrator, the CSI driver provided by Pure Storage, is utilising storage. One of the features of PSOX is its ability to identify orphaned volumes from a Kubernetes cluster.

Persistent Volume Granularity

There are a lot of options available when it comes to how the pod can access the persistent storage volume and these are controlled by Kubernetes. These different options are normally defined with a storageClass.

The most common of these is the accessMode which controls how the data in the PV can be accessed and modified. There are three modes available in Kubernetes:

  • ReadWriteMany (RWX) – the volume can be mounted as read-write by many nodes
  • ReadWriteOnce (RWO) – the volume can be mounted as read-write by a single node
  • ReadOnlyMany (ROX) – the volume can be mounted read-only by many nodes

Additional controls for the underlying storage volume can be provided through the storageClass include mount options, volume expansion, binding mode which is usually used in conjunction with storage topology (also managed through the storageClass). 

A storageClass can also apply specific, non-standard, granularity for different features a CSI driver can support.

In the case of Pure Service Orchestrator, all of the above-mentioned options are available to an administrator creating storage classes, plus a number of the non-standard features.

Here is an example of a storageClass definition configured to use Pure Service Orchestrator as the CSI provisioner:

apiVersion: storage.k8s.io/v1
kind: StorageClass
metadata:
  name: example
provisioner: pure-csi
parameters:
  iops_limit: "30000"
  bandwidth_limit: "10G"
  backend: block
  csi.storage.k8s.io/fstype: xfs
  createoptions: -q
mountOptions:
  - discard
allowedTopologies:
  - matchLabelExpressions:
      - key: topology.purestorage.com/rack
        values:
          - rack-0
          - rack-1
allowedVolumeExpansion: true

This might look a little complex, but simplistically this example ensures that PersistentVolumes created through this storageClass will have the following attributes:

  • Quality of Service limits of 10Gb/s bandwidth and 30k IOPs
  • Volumes are capable of being expended in size
  • One first use by a pod the volume will be formatted with the xfs filesystem and mounted with the discard flag
  • The volume will only be created by an underlying FlashArray found in either rack-0 or rack-1 (based on labels defined in the PSO configuration file)

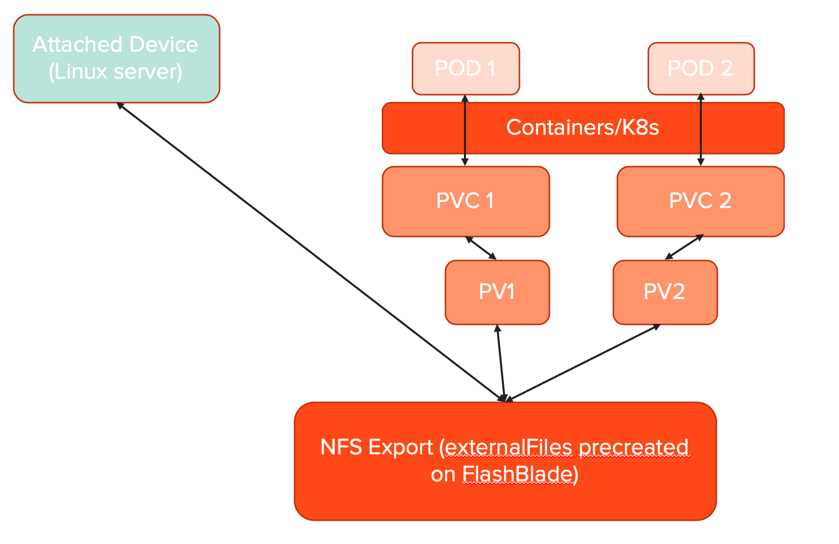
Pure Service Orchestrator even allows the parameters setting to control the NFS ExportRules of PersistentVolumes created on a FlashBlade.

Check back for Part 3 of this series, where I’ll discuss the latest developments in ephemeral storage in Kubernetes.

Ephemeral or Persistent? The Storage Choices for Containers (Part 1)

In this series of posts, I’ll cover the difference between ephemeral and persistent storage as far as Kubernetes containers are concerned and discuss the latest developments in ephemeral storage. I’ll also occasionally mention Pure Service Orchestrator™ to show how this can provide storage to your applications do matter what type is required.

Back in the mists of time when Kubernetes and containers, in general, were young storage was only ephemeral. There was no concept of persistency for your storage and the applications running in container environments were inherently ephemeral themselves and therefore there was no need for data persistency.

Initially, with the development of FlexDriver plugins and lately CSI compliant drivers, persistent storage has become a mainstream offering to enable applications that need or require state for their data. Persistent storage will be covered in the second blog in this series.

Ephemeral Storage

Ephemeral storage can come from several different locations, the most popular and simplest being emptyDir. This is, as the name implies, an empty directory mounted in the container that can be accessed by one or more pods in the container. When the container terminates, whether that be cleanly or through a failure event, the mounted emptyDir storage is erased and all its contents are lost forever. 

emptyDir

You might wonder where this “storage” used by emptyDir comes from and that is a great question. It can come from one of two places. The most common is actually from the actual physical storage available to the Kubernetes nodes running the container, usually from the root partition. This space is finite and completely dependent on the available free capacity of the disk partition the directory is present on. This partition is also used for lots of other dynamic data, such as container logs, image layers, and container-writable layers, so it is potentially an ever-decreasing resource.

To create this type of ephemeral storage for a pod(s) running in a container, ensure the pod specification has the following section:

 volumes:
  - name: demo-volume
    emptyDir: {}

Note that the {} states that we are not providing any further requirements for the ephemeral volume. The name parameter is required so that pods can mount the emptyDir volume, like this:

   volumeMounts:
    - mountPath: /demo
      name: demo-volume

If multiple pods are running in the container they can all access the same emptyDir if they mount the same volume name.

From the pods perspective, the emptyDir is a real filesystem mapped to the root partition, which is already part utilised, so you will see it in a df command, executed in the pod, as follows (this example has the pod running on a Red Hat CoreOS worker node):

# df -h /demo
Filesystem                Size      Used Available Use% Mounted on
/dev/mapper/coreos-luks-root-nocrypt
                        119.5G     28.3G     91.2G  24% /demo

If you want to limit the size of your ephemeral storage this can be achieved by adding resource limits to the container in the pod as follows:

      requests:
        ephemeral-storage: "2Gi"
      limits:
        ephemeral-storage: "4Gi"

Here the container has requested 2GiB of local ephemeral storage, but the container has a limit of 4GiB of local ephemeral storage.

Note that if you use this method and you exceed the ephemeral-storage limits value the Kubernetes eviction manager will evict the pod, so this is a very aggressive space limit enforcement method.

emptyDir from RAM

There might be instances that you only need a minimal scratch space area for your emptyDir and you don’t want to use any of the root partition. In this case, resources permitting, you can create this in RAM. The only difference in the creation of the emptyDir is that more information is passed during its creation in the pod specification as follows:

 volumes:
  - name: demo-volume
    emptyDir:
      medium: Memory

In this case, the default size of the mounted directory is half of the RAM the running node has and is mounted on tmpfs. For example, here the worker node has just under 32GB of RAM and therefore the emptyDir is 15.7GB, about half:

# df -h /demo
Filesystem                Size      Used Available Use% Mounted on
tmpfs                    15.7G         0     15.7G   0% /demo

You can use the concept of sizeLimit for the RAM-based emptyDir but this does not work as you would expect (at the time of writing). In this case, the sizeLimit is used by the Kubernetes eviction manager to evict any pods that exceed the sizeLimit specified in the emptyDir

Check back for Part 2 of this series, where I’ll discuss persistent storage in Kubernetes.

Portworx and TKG – Portworx Scalable Storage in TKG

Portworx + Pure Storage = awesome

I have recently been pretty occupied with learning TKG and oh yeah also Portworx. I wanted to share what I have learned so far when it comes to getting Portworx up and running in a TKG Cluster. So without too much introduction lets dive right in.

Create a new cluster

You need 3 worker nodes for Portworx.

tkg create cluster px1 --plan=dev -w 3

Install Portworx

Get IP’s for Ansible inventory
TKG uses DHCP for all of the deployed Kubernetes VM’s which is fine. This command will create an inventory.ini in order to run ansible playbooks against the cluster. Remember if you add nodes to update the inventory.ini.

kubectl get nodes -o jsonpath='{.items[*].status.addresses[?(@.type=="ExternalIP")].address}' | awk -v ORS='\n' '{ for (i = 1; i <= NF; i++) print $i }' >inventory.ini

Run the Ansible Playbook
This playbook is install the linux headers the TKG Photon template does not include. Copy this playbook and save it to playbook.yaml for example.

--- 
- hosts: all 
  become: yes 
  tasks: 
  - name: upgrade photon 
    raw: tdnf install -y linux-devel-$(uname -r)
ansible-playbook -i inventory.ini -b -v playbook.yaml -u capv

Notice that the username for the TKG nodes is capv.

# Follow this link from portworx for more details.

https://docs.portworx.com/cloud-references/auto-disk-provisioning/vsphere/

Create the vsphere credentials in a secret

Create a vsphere-secret.yaml file and paste the yaml below making sure replace the credentials with your own generated with the base64 example below.

#VSPHERE_USER: Use output of printf <vcenter-server-user> | base64
#VSPHERE_PASSWORD: Use output of printf <vcenter-server-password> | base64
apiVersion: v1
kind: Secret
metadata:
  name: px-vsphere-secret
  namespace: kube-system
type: Opaque
data:
  VSPHERE_USER: YWRtaW5pc3RyYXRvckB2c3BoZXJlLmxvY2Fs
  VSPHERE_PASSWORD: cHgxLjMuMEZUVw==

Then apply the secret

kubectl apply -f vsphere-secret.yaml

# Hostname or IP of your vCenter server

export VSPHERE_VCENTER=vc01.fsa.lab


# Prefix of your shared ESXi datastore(s) names. Portworx will use datastores who names match this prefix to create disks.

export VSPHERE_DATASTORE_PREFIX=px1


# Change this to the port number vSphere services are running on if you have changed the default port 443

export VSPHERE_VCENTER_PORT=443

export VSPHERE_DISK_TEMPLATE=type=thin,size=200

export VER=$(kubectl version --short | awk -Fv '/Server Version: /{print $3}')

curl -fsL -o px-spec.yaml "https://install.portworx.com/2.6?kbver=$VER&c=portworx-demo-cluster&b=true&st=k8s&csi=true&vsp=true&ds=$VSPHERE_DATASTORE_PREFIX&vc=$VSPHERE_VCENTER&s=%22$VSPHERE_DISK_TEMPLATE%22"

kubectl apply -f px-spec.yaml

So the curl command at the end of this code block will create the px-spec.yaml file that will install Portworx in your cluster. Notice all the variables that have to be set for this to work. If you skip any of these above or below you will have problems.

Create a repl = 3 storage class or whatever you want to test.

Copy the text below to a new file called px-repl3-sc.yaml

kind: StorageClass
apiVersion: storage.k8s.io/v1
metadata:
    name: px-repl3-sc
provisioner: kubernetes.io/portworx-volume
parameters:
   repl: "3"

Then apply the new StorageClass

kubectl apply -f px-repl3-sc.yaml

PX Backup also will get you the PX-Central UI

helm install px-backup portworx/px-backup --namespace px-backup --create-namespace --set persistentStorage.enabled=true,persistentStorage.storageClassName="px-repl3-s"

This will get you up and running on a trial license and enough to experiment and learn Portworx. If you are new to helm make sure to learn more here.

QoS with Pure Service Orchestrator v6 to keep apps from running amok

One of the great new features of PSO 6 is ability to create a storage class with a pre-defined limit on IO or bandwidth (or both). Watch the following short demo to check it out.

QoS on PSO 6

More information can be found here in the PSO 6 documentation. https://github.com/purestorage/pso-csi/blob/master/docs/csi-qos-control.md

A quick sample

kind: StorageClass
apiVersion: storage.k8s.io/v1
metadata:
  name: pure-block-gold
  labels:
    kubernetes.io/cluster-service: "true"
provisioner: pure-csi
parameters:
  #TODO: choose limits
  iops_limit: "30000"
  bandwidth_limit: "10G"
  backend: block
  csi.storage.k8s.io/fstype: xfs
  createoptions: -q
allowVolumeExpansion: true

Pure Service Orchestrator 6 is now GA!

Smart Provisioning in PSO 6

Simon covers the details here:
https://blog.purestorage.com/pure-service-orchestrator-6-0/

Now if you used any of the old versions of PSO you know it can smart provision across Pure Storage arrays with a single storageClass for block and one for file. Today I am proud to share the mysterious and sometimes confusing third storageClass pure is no longer installed with PSO 6. The long story is that storage class was to support legacy systems that use the 1.0 version of our driver. There has been 2.5 years to get used to pure-block. So now with the upgrade you can make the right choice.

 jowings@asgard  ~/pso-values  k get sc
NAME         PROVISIONER   RECLAIMPOLICY   VOLUMEBINDINGMODE   ALLOWVOLUMEEXPANSION   AGE
pure-block   pure-csi      Delete          Immediate           true                   56s
pure-file    pure-csi      Delete          Immediate           true                   56s

Now you have only two obvious choices.

Kubernetes PVC mounted by External Devices

I want to attach to a share that is already used by a physical server or some other device. I also want to attach containers that are orchestrated by K8s. This scenario is one customers have been asking for since the first version of Pure Service Orchestrator. When you normally create a PVC the PSO provisioner creates a volume or filesystem that looks something like this:

The first version of PSO’s FlexVolume Driver supported an import feature but it would take an existing volume and rename it to something like in the screenshot above. With the new “soft import” feature now in the latest PSO CSI driver you can now create a PVC tied to any existing volume and it won’t rename it. So any external connections or applications are not interrupted. How can you do this?

  1. Install PSO
  2. Create a PV using the volumeHandle example:
apiVersion: v1
kind: PersistentVolume
metadata:
  annotations:
    pv.kubernetes.io/provisioned-by: pure-csi
  name: pv-import
spec:
  accessModes:
  - ReadWriteOnce
  capacity:
    storage: 1Ti
  claimRef:
    apiVersion: v1
    kind: PersistentVolumeClaim
    # TODO: change to the PVC you want to bind this PV.
    # If you don't pre-bind PVC here, the PV might be automatically bound to a PVC by scheduler.
    name: pvc-import1
    # Namespace of the PVC
    namespace: app1
  csi:
    driver: pure-csi
    # TODO: change to the volume name in backend.
    # Volume with any name that exists in backend can be imported, and will not be renamed.
    volumeHandle: externalfiles
    volumeAttributes:
      backend: file
  # TODO: configure your desired reclaim policy,
  # Use Retain if you don't want your volume to get deleted when the PV is deleted.
  persistentVolumeReclaimPolicy: Retain
  storageClassName: pure-file
  volumeMode: Filesystem

Very Important Note: persistentVolumeReclaimPolicy is set to Retain. This ensures the filesystem is not deleted if the PV is deleted.

Notice the externalfiles volumeHandle matches the filesystem already in use on the FlashBlade.

3. Now we have to create a PVC to match the namespace and name specified in the PV.

apiVersion: "v1"
kind: "PersistentVolumeClaim"
metadata:
  name: pvc-import1
spec:
  accessModes:
    - "ReadWriteOnce"
  resources:
    requests:
      storage: "1Ti"
  # Note: These two fields are not required for pre-bound PV.
  storageClassName: pure-file
  volumeMode: Filesystem

  # TODO: Change to the name of the imported PV.
  volumeName: pv-import

Notice the volumeName matches the PV we created earlier.

Now your Pod can mount the PVC. Even if it is already mounted. For that kind of multi-attach NFS is required.

Webinar: Raising the Bar for Kubernetes Backup and Mobility

Coming July 14 at 12 EST or 9am PST there will be a combined Kasten and Pure webinar about Kubernetes backup and mobility. As you are working on providing the expected levels of enterprise grade backup and recovery for you k8s based applications this will be a great webinar to help you learn more about what you can use to fill those requirements. Register here:

https://www.kasten.io/webinar-raising-the-bar-for-kubernetes-backup-and-mobility

Pure-Storage-webinar

There will be a demo! Looking forward to seeing all of you there.

Oh My Zsh – Fix my Command Prompt

I do a lot of CLI demos when showing off PSO and K8s and Helm and all the cool things they can do. I made the switch to ZSH and oh my zsh and I really like using it for the past year.

After trying a few different themes and prompts I settled on the following using the “Agnoster” theme for oh-my-zsh. I added the kube-ps1 plugin so I can see what cluster I am using.

Pretty sweet prompt

One annoyance is getting when I am in some github repo for a demo deploying containers and ingresses and stuff the prompt gets so long the wordwrap on iTerm window makes me crazy.

I don’t even know what I am typing anymore

Break down of my full prompt

  • User name – good to know, I have cloud instances that are ‘ubuntu’ or ‘ec2-user’ so this helps me know what I am working on.
  • Hostname – I can shorten this, but there is a jamf policy on this machine that sets it back to this monstrosity. I mean, really who forces the username into the hostname?
  • Path to code – Do I need to see this full path all the time? Probably not.
  • Git Branch – Good to know when I am coding.
  • K8s Icon – Non-negotiable. It is awesome.
  • K8s Cluster/Context – I currently am testing 9 versions of K8s and different clusters. This keeps me sane.
  • K8s Namespace – This for me is nearly always default since I use kubectl -n <namespace> to do things in namespaces.

I saw someone with a different shell with the cool shorthand path and I felt like that should be an option for my prompt. I like everything else about the agnoster theme. So how can I fix it.

First I found this plugin for ohmyzsh:

https://github.com/ohmyzsh/ohmyzsh/tree/master/plugins/shrink-path

So I enabled it within my .zshrc: below is my plugins and 2 important sections.

plugins=(
        git
        kube-ps1
        vscode
        kubectl
        shrink-path
)

source $ZSH/oh-my-zsh.sh
PROMPT='$(kube_ps1)'$PROMPT

The extra “PROMPT” is to add the kubernetes information to the existing prompt generated by the above ‘source oh-my-zsh.sh’

This didn’t magically fix the prompt like I hoped. Somewhere we have to tell the theme how to build the prompt.

If we edit the ~/.oh-my-zsh/themes/agnoster.zsh-theme we actually see the function that builds the prompt.

## Main prompt
build_prompt() {
  RETVAL=$?
  prompt_status
  prompt_virtualenv
  prompt_aws
  prompt_context
  prompt_dir
  prompt_git
  prompt_bzr
  prompt_hg
  prompt_end
}

PROMPT='%{%f%b%k%}$(build_prompt) '

Of course it is a function that calls a bunch of others and “prompt_dir” is the one we want to edit.

Change it from this:

prompt_dir() {
  prompt_segment blue $CURRENT_FG '%~'
}

To this:

prompt_dir() {
  SHORT=$(shrink_path -f)
  prompt_segment blue $CURRENT_FG $SHORT
   }

Now we are using “shrink_path -f” to shorten the directories in the path and storing it in the SHORT variable. Then displaying it in the same spot as full path was before.

Look at how that path was shortened! So far this is working for me on:

  • Windows 10 WSL2 – Ubuntu 18.04
  • Linux Server with Ubuntu 16.04 and 18.04
  • Mac OSX Mojave

Kubectl – check all the contexts

Every so ofter I get in a situation where I need to see if my configuration is still valid for every cluster in my Kubernetes config. I blogged a while back about managing multiple configs. Then, eventually, your K8s config ends up looking like this:

Some k8s clusters
Then TKG comes and helps it multiply

It gets tedious to go through every config like this:

kubectl config use-context <the next context>
kubectl get pod
<blah blah>

Through a little googling I now use this command to go through each cluster and run a command.

kubectl config get-contexts -o name | xargs -I {} kubectl --context={} get nodes -o wide

Now I can quickly see if a cluster fails to authenticate because I did something like rebuilt it and didn’t update the configuration on my local machine.

Another favorite of mine is:

kubectl config get-contexts -o name | xargs -I {} kubectl --context={} get pvc -A

Since I have to check all the storage on each cluster.

PVC’s for days

Yes, there is a theme to my cluster names and users.